Thursday, September 30, 2010

Fall Recipes!

Having a recipe blog is much more exciting when you have pictures to show for it, don't you think?! Well, I'm having some issues with uploading photos (actually, blogger is having issues), so I don't want to post any more of the wonderful recipes I have in my queue until the problem is solved.

Until them, check out these beautiful recipes--perfect for fall!

Spicy Molasses Cookies
Mel's Own Banana Bread
Pumpkin Nut Bread
Swirled Cinnamon-Apple Bread
Pumpkin Spice Granola
Pumpkin Pancakes
Homemade Popcorn
Spicy Italian Sausage Chili
Spicy Fiesta Soup

Wednesday, September 29, 2010

Chicken Fajitas


This is the type of meal I whip up on a regular basis--normally when I have no advanced plan for dinner and I throw random things in a skillet and see what inspires me. This is delicious and easy--and don't be afraid to change things up to suit your pantry and palate needs. 

Serves 2-3 people 
Ingredients
2 small boneless, skinless chicken breasts (or one large sliced in half--butterfly style)
1/2 green pepper, sliced
1 small onion, diced
1-2 garlic cloves, minced
1 Roma tomato, diced
1/2 jalapeño, finely chopped
Cumin
Taco Seasoning, optional
Salt
Pepper
5-8 corn tortillas (~5inch)

Directions
Heat a skillet to medium low and drizzle with EVOO or canola oil. Add onions and garlic and green peppers. Sauté until softened. Meanwhile, pat taco seasoning onto both sides of the chicken. Rearrange veggies in the skillet to make room for the chicken breasts. Cover and cook for about 4 minutes on one side--do not move the chicken around--let it cook. Flip chicken and stir veggies. Add in tomatoes. Sprinkle with salt, pepper, cumin, and additional taco seasoning if desired. Cover and let cook for another 3-4 minutes. 

Heat another skillet to high. Place one tortilla at a time in the skillet for 20-30 seconds per side. Cover and keep warm. 

Fill tortilla with fajita mixture and top with sour cream and chopped cilantro if desired. 

Saturday, September 25, 2010

Thick and Chewy Chocolate Chip Cookies


I thought I had found the perfect chocolate chip cookie recipe. 
And, honestly, I still don't think I'll ever meet a chocolate chip cookie I don't like.
But nonetheless, you must disregard all previous claims I've made about chocolate chip cookies. 
These.
are. 
the.
most.
amazing.
chocolate.
chip.
cookies.
EVER.

The recipe comes from Baking Illustrated and I found it on one of my favorite food blogs: Brown Eyed Baker.

No, this doesn't make a lot of cookies, but it does make 18-20 amazingly large, perfectly chewy, awesomely chocolately chip cookies.  These are best the day (or 20 minutes after) they come out of the oven, but they're always delicious. And frankly, friends, I might never go searching again. This is where it's at. 


Ingredients
2 cups plus 2 tablespoons (10 5/8 ounces) unbleached all-purpose flour
1/2 teaspoon baking soda
1/2 teaspoon salt
12 tablespoons (1 1/2 sticks) unsalted butter, melted and cooled until warm
1 cup packed (7 ounces) light or dark brown sugar
1/2 cup (3 1/2 ounces) granulated sugar
1 large egg plus 1 egg yolk
2 teaspoons vanilla extract
1-1 1/2 cups semisweet chocolate chips

Directions
1. Adjust the oven racks to the upper- and lower-middle positions and heat the oven to 325 degrees. Line 2 large baking sheets with parchment paper or spray them with nonstick cooking spray.

2. Whisk the flour, baking soda, and salt together in a medium bowl; set aside.

3. Either by hand or with an electric mixer, mix the butter and sugars until thoroughly blended. Beat in the egg, yolk, and vanilla until combined. Add the dry ingredients and beat at low speed just until combined. Stir in the chips to taste.

4. Roll a scant 1/4 cup of the dough into a ball. Hold the dough ball with the fingertips of both hands and pull into 2 equal halves. Rotate the halves 90 degrees and, with jagged surfaces facing up, join the halves together at their base, again forming a single ball, being careful not to smooth the dough’s uneven surface. Place the formed dough balls on the prepared baking sheets, jagged surface up, spacing them 2 1/2 inches apart.

5. Bake until the cookies are light golden grown and the outer edges start to harden yet the centers are still soft and puffy, 15 to 18 minutes, rotating the baking sheets front to back and top to bottom halfway through the baking time. Cool the cookies on the sheets. Remove the cooled cookies from the baking sheets with a side metal spatula.

6. Eat your heart out.

Saturday, September 18, 2010

Strawberry-Sour Cream Ice Cream


This ice cream is heavenly. 
Though what I should I expect from David Lebovitz--ice cream aficionado?
I was kind of curious when I saw sour cream on the list of ingredients, but you mustn't change this! 
The tang of the sour cream perfectly accents the sweet and tartness of the berries. 
It's an amazing (and almost lethal) combination. 
Throw in some heavy cream and you've got yourself a dream in a bowl. 


Makes 1-1/4 quarts

Ingredients
1 pound fresh strawberries, rinsed and hulled
3/4 cup sugar
1 cup sour cream
1 cup heavy cream
1/2 tsp lemon juice

Directions
Slice the strawberries and toss them in a bowl with the sugar, stirring until the sugar begins to dissolve. Cover and let stand at room temperature for 1 hour, stirring every so often. 

Pulse the strawberries and their liquid with the sour cream, heavy cream, and lemon juice in a blender or food processor until almost smooth but still slightly chunky. 

Refrigerate for 1 hour, then freeze in your ice cream maker according to the instructions.


Tuesday, September 14, 2010

Strawberry Pretzel Bars


These bars have always been one of my favorite desserts--
as in, if it's at a dinner or potluck I cannot resist. 
I have found FAR too many people who have no idea what this dessert is all about. 
And when you describe it, there doesn't seem to be a whole lot of attraction. 
But once you try a piece of this concoction, I think you'll agree!

I haven't had this glorious little dessert for years and years. 
But when I found Brown Eyed Baker's post about it, I knew it was time to bring this recipe back to life. 

Though none of the steps are complicated, there are a LOT of steps to this little recipe. 
Between crushing (processing) pretzels, melting butter, boiling water, stirring Jello, slicing strawberries, stirring fluffy filling, I think I dirtied EVERY bowl in my entire kitchen. 
But despite all the steps which might be interpreted as hassle, this dessert is SO worth it.  
Perfect for parties and potlucks, I encourage you to try this out the next time you need to bring a dish.
This was gobbled up in an instant!


recipe adapted from browneyedbaker.com and kraftrecipes.com 
NOTE: be sure to allot 4 or 5 hours in order for gelatin to set--in other words, don't wait till the last minute!

Ingredients
2 cups finely crushed pretzels
1/2 cup sugar, divided
2/3 cup butter or margarine, melted
1 and 1/2 pkg. (8 oz. plus 4 oz) Cream Cheese (or the lighter Neufchatel version), softened
2 Tbsp. milk
1 cup thawed Cool Whip Whipped Topping (or light)
2 cups boiling water
1 pkg. (8-serving size, 6oz.) Strawberry Flavor Gelatin
1½ cups cold water
1 qt. (4 cups--2 lbs.) strawberries, sliced

Directions
Preheat oven to 350°F. Mix pretzel crumbs, 1/4 cup of the sugar and the butter. Press onto bottom of 13×9-inch baking pan. Bake 10 min. Cool.

Beat cream cheese, remaining 1/4 cup sugar and the milk until well blended. Gently stir in whipped topping. Spread over crust. Refrigerate until ready to use.

Meanwhile, stir boiling water into dry gelatin mix in large bowl at least 2 min. until completely dissolved. Stir in cold water. Refrigerate 1½ hours or until thickened (spoon drawn through leaves definite impression). Stir in strawberries. 
Spoon over cream cheese layer. Refrigerate 3 hours or until firm. Cut into squares to serve. Store leftovers in refrigerator.

Saturday, September 11, 2010

Perfectly Scrambled Eggs


Most everyone loves scrambled eggs. 
They are such a simple food and a blank slate for so many recipes. 
But sometimes you just want eggs. 
And you want them to be delicious.
And you think, "Scrambled eggs are super easy to make, right?"
Well, yes and no.

I've been scrambling eggs since I could see over the egg of the stove. 
And I grew up with my dad's version of scrambled eggs--microwaved.
Most people would probably think of microwaved eggs as kind of weird, they hold a special place in my heart--
reminding me of those nights when no one could think of what to make for dinner besides breakfast!

In the last couple years, I've made eggs for Kevin and I many times.
But something wasn't right. 
They weren't perfectly delicious--moist, fluffy, tasty. 
They were just cooked eggs. 

But I've since discovered the secret to perfectly scrambled eggs. 
A wooden spoon
I've tried spatulas and whisks and pancake flippers and every tool in between, but the age-old wooden spoon is where. it's. at. 
Try it. You won't be sorry. 

Ingredients
4-6 large eggs
2-3 splashes of milk
salt and pepper to taste

Directions
Heat a large non-stick skillet to medium low heat. In a large bowl, break eggs. Using a fork or a whisk, briskly beat the eggs. Add milk, a splash or two (don't want white eggs!). Once skillet is heated (when a drop of water sizzles), pour in the eggs. 


Sprinkle in salt and pepper. Using a wooden spoon (I have found this is the KEY!), stir eggs in a figure eight fashion, being sure to scrape the edges. 


Let set for a 30 seconds at a time in between stirs. (You don't want the eggs to form an omelet.) 


Stir until eggs are beautifully scrambled, still moist (dry eggs are a no-no), but not runny! 


Sprinkle with extra salt and pepper if desired and enjoy! 


Wednesday, September 8, 2010

Banana Chocolate Chip Oatmeal Bread


Banana bread is always the way to go when the overripe fruit sits uneaten. In fact, I might confess to allowing bananas to turn brown just so I can have a great excuse to try a new banana bread recipe! :) Or I check Meijer's discount produce rack that sometimes sells overripe bananas for $0.19/pound. 

I have my favorite straight up banana bread recipe, but when I saw "oats" and "chocolate" in the title of this recipe on Tasty Kitchen, I had to try it. It had rave reviews from all of the testers. And it did not disappoint. It's moist and sweet, yet quite hearty. 

I'm so glad I stumbled upon this recipe by multiplydelicious.com. With a few personal tweaks, I made it my own and we LOVE it. With the whole wheat and oats and smaller amount of fat compared to most recipes, I feel like this is actually a little bit nutritious. But that's not why I just ate three pieces. ;)


Ingredients 
1 cup Whole Wheat Flour
1 cup White Flour
1 cup Rolled Oats
½ cup Sugar
½ cup Brown Sugar
2 teaspoons Baking Powder
1 teaspoon Baking Soda
1 teaspoon Cinnamon
½ teaspoons Salt
1-½ cup Buttermilk (OR milk plus 1-1/2 Tbsp lemon juice)
2 whole Eggs, Lightly Beaten
¼ cups Unsalted Butter, melted
1 cup Ripe Bananas, Mashed (about 3 Medium)
¾ cups Semi-sweet (or Dark!) Chocolate Chips

Direction
Preheat oven to 350 degrees. Spray two 9×5 inch pans with non-stick cooking spray; set aside.

In a large bowl, whisk together flour, oats, both sugars, baking powder, baking soda, cinnamon, and salt.

In a medium bowl, mix together buttermilk, eggs, butter, and bananas. Pour into dry ingredients and mix until well combined. Stir in chocolate chips.

Pour batter into prepared pans and bake at 350 degrees for 40 to 45 minutes until a toothpick inserted comes out clean.

Note: you can also use the batter to make muffins. The muffins will need to bake for about 20 to 25 minutes.


Tuesday, September 7, 2010

Southwestern Stuffed Peppers


I love green peppers. 
If you don't, I'd recommend passing on this recipe.
Which is unfortunate, because it's delicious. 
But nonetheless, it's kind of heavy on the green pepper

Our farmer's market is selling green peppers for a quarter each so I've been stocking up each time I shop. I figure I can slice them and freeze them if I can't use them all up in time.  But tonight, we opted for stuffed peppers. And I decided to not use a recipe. I was winging it. And I didn't really know which direction I was going for a bit. I started with sautéing the garlic and onions because that's what I start every dish with. :) After that, I realized I wanted to take this the "Mexican" route using the jalapeños and corn and cumin to bring the flavors to life. It turned out beautifully. 

Ingredients
2 whole green peppers
canola oil or EVOO
2 cloves garlic, minced
1/2 small onion, finely chopped
1/2 jalapeno pepper, finely chopped
1/2 carrot, grated
3/4 cup corn (frozen is fine)
2 Tbsp tomato paste
salt and pepper 
1 tsp cumin 
1 cup enchilada sauce 
1-1/2 to 2 cups cooked rice 

Directions
Preheat oven to 400 degrees. 

Heat a large skillet to medium low heat and drizzle with oil. Sauté onions and garlic until soft and fragrant. Add jalapeños and carrots and corn. Cook until softened. Stir in spices and tomato paste. Cook 5 minutes to meld flavors. Stir in enchilada sauce and cook 5 more minutes. Stir in cooked rice (as little or as much as you desire to a thick, but moist consistency.) 

Wash peppers and slice the tops off. Scoop out veins and seeds. Stuff peppers with filling. Recap if desired. Cover loosely with foil and bake 30-40 minutes or until peppers are fork tender--or softened to your preference (we like ours with a bit of crispness, while most recipes desire a soft pepper--your choice!)

Serve with a bit of grated cheese. 


Monday, September 6, 2010

Garlic and Lemon Tilapia


I'm not a huge a fan of fish. 
Which is either really ironic or really relieving given my maiden name. 
I only like shrimp or clams when they're all battered and fried. 
But who doesn't like anything battered and fried, I mean really?
But Tilapia? Now that's a fish I can sink my teeth into.
It's mild tasting.
It falls apart with the touch of your fork.
It's the EASIEST "meat" to prepare.
Seriously.
I was shocked the first time I fixed Tilapia for dinner.
It takes about 6 minutes on the stove top. 
With a sprinkle of garlic.
And you've got melt-in-your-mouth, not to mention uber nutritious fish. 


Ingredients
canola or extra virgin olive oil
Tilapia fillets, defrosted

Made for fish/poultry seasoning OR
Garlic powder

Parmesan cheese, grated
Thyme
Lemon Juice 

Directions
Heat a skillet to medium-low heat and drizzle with oil. Begin cooking the fish when the rest of the meal has less than 10 minutes to cook. Season fish on one side and place season-side-down in the heated skillet. Cook for 3 minutes. Season the top of the fish. Flip over and cook on the other side for 3 more minutes. Serve! (with a lemon wedge and these potatoes, if you feel like it. :D) 

Sunday, September 5, 2010

Garlic Thyme Skillet Potatoes


We love garlic.
And onions.
Almost everything I make starts out with those two ingredients.
I believe Rachael and Giada would be proud.

Another food staple in our home is potatoes.
Those darn root vegetables are so amazingly versatile.
Breakfast, lunch, dinner.
Smash them, boil them, stick 'em in a stew.
Fry them, cube them, slice 'em up for you.
(couldn't resist a little rhyme.)
Last night I threw together those three ingredients along with green peppers and sliced sausage and voila! We had a delicious dinner.

Kevin wanted the same thing today for lunch, but something in me won't allow it
(unless, of course, all of my creative juices are drained.)
So I did a similar potato dish,
threw in some thyme
(I knew it's lemony flavor would perfectly accent the Tilapia)
and served with veggies and fish.
It was healthy, nutritious and easy.


serves 2-3 (as a side dish)
Ingredients
1 Tbsp canola or extra virgin olive oil 
3 small red skinned (or other) potato
2-3 cloves garlic, minced
1/2 small onion, sliced thin 
salt
pepper
dried thyme 

Directions
Wash and scrub potatoes thoroughly. Heat large skillet to medium-low heat and drizzle with oil. When a drop of water lightly sizzles in the oil, add garlic and onions (be careful! You don't want to burn the garlic and it happens so easily! Keep the pan at a low sizzle.) Meanwhile, dice potatoes--the smaller the dice the quicker they cook. (I like mine at 1/2 or 3/4 inch squares.) After 2-3 minutes of cooking the garlic and onions, add potatoes in a single layer. Season generously with pepper and salt. Cover for five minutes. Stir, being sure to flip potatoes to cook opposite sides. Continue cooking (I leave the lid off at this point) for 10 more minutes or until the potato is perfectly cooked (soft enough without being mushy.) 

Serve with...well...practically anything! Tonight we had ours with sautéed Tilapia and broccoli.  

Thursday, September 2, 2010

Homemade Sloppy Joes

Now THAT'S a combination you can't beat. 


Neither my husband nor I are huge Sloppy Joe fans. But I have come to realize that it's because we've never had really good Sloppy Joes. THESE are really good Sloppy Joes. I'm so glad I stumbled upon it over at Ezra Pound Cake. They are meaty and full of flavor and texture and...interest. :) Garlic, tomatoes, onions, chili pepper flakes, and Worcestershire. The perfect combination of heat and tang, sweet and spicy. I hope you enjoy these as much as we did!  

Note: I cut the recipe in half and found we had enough for 3 larger sandwiches or 4 small ones. But that's just us. :) I'm assuming leftovers will just get better.

::Kevin likes his overflowing to the point of forcing him to eat with a knife and fork::
whatever floats your boat.


Serves 4-6
Ingredients
for the hamburger base:
2 tablespoons vegetable oil
1/2 medium onion, chopped finely
1/2 teaspoon salt
2 cloves garlic, minced
2 teaspoons chili powder
1 pound ground sirloin
Freshly ground black pepper, to taste

for tomato sauce:
1 15-ounce can tomato sauce
1/4 cup water
1/4 cup dark brown sugar
1 to 2 tablespoons red wine vinegar
1 tablespoon Worcestershire sauce
1 tablespoon yellow mustard
1 to 2 teaspoons crushed red pepper flakes
2 tablespoons tomato paste
Salt and Pepper to taste
4 hamburger buns
Butter, for spreading on hamburger buns

Directions
A piece of advice Rebecca offers (which I neglected to follow) is to make the tomato sauce ahead of time, refrigerate at least an hour, and allow the flavors to meld together yielding even tastier results. 

In a large skillet, heat the oil to medium-high. Add onion and salt, lower heat to medium, and sauté until the onion is soft and translucent, about 5 minutes. Add garlic and chili powder, and cook for about 30 seconds. Add beef, and cook for about 5 minutes, breaking it up as you stir. 

In the meantime, grab a medium bowl, and combine the tomato sauce, water, brown sugar, red wine vinegar, Worcestershire sauce, yellow mustard and red pepper flakes. Add the tomato mixture to the beef. Stir in the tomato paste. Simmer for at least 10 minutes, or until the mixture reaches your desired consistency. (If it seems a little “wet,” just keep simmering or add small amounts of tomato paste.)

To make your sandwiches that much more delicious, toast hamburger buns. Warm a skillet over medium heat. Butter the insides of the buns, and place them butter-side down in the skillet. Toast.

Taste the Sloppy Joe mixture, and adjust the seasonings. Sandwich the mixture in the hamburger buns, and serve.


Adapted from Rebecca Crumb's recipe at ezrapoundcake.com

Wednesday, September 1, 2010

Cowboy Cookies

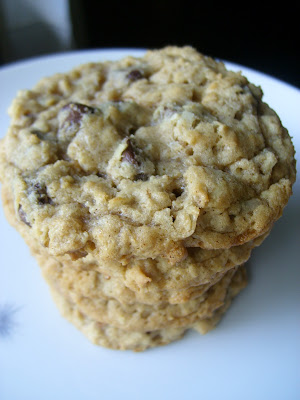
aka: chunky oatmeal chocolate chip cookies


This recipe is fanTASTIC! My husband absolutely loved them (which is saying something because he loves all my cookies and gets to eat them quite frequently. But he really raved over these!) They're the perfect everything--hearty, crisp, chewy, sweet, unexpected.  The old fashioned oats add a great texture as does the coconut (which you cannot taste--it adds that perfect element.) The cinnamon makes you expect your traditional oatmeal cookie, but the chocolate chips means we've won over the "Chocolate Chip Cookie Lovers"


The amount of cookies this recipe yields is a bit overwhelming--astronomical even. But they're THAT good. If you have a way to use 80+ cookies--which I DO--then, by all means, bake the whole darn recipe.  If not, please feel free to cut the recipe in half (to halve the 3 eggs, beat all three together in a liquid measuring cup and divide in half according to the measurements.) 


Cowboy Cookies adapted from Brown Eyed Baker who adapted it from Laura Bush 
(yes, as in the former President's wife.
She apparently won an award with these bad boys!)

Yield: 3 dozen large cookies or 6 dozen "regular" sized cookies

Ingredients
3/4 cup margarine, at room temperature
3/4 cup shortening
1½ cups granulated sugar
1½ cups packed light brown sugar
3 large eggs
1 tablespoon vanilla

3 cups all-purpose flour
1 tablespoon baking powder
1 tablespoon baking soda
1 tablespoon ground cinnamon
1 teaspoon salt
3 cups semisweet chocolate chips
3 cups old-fashioned rolled oats
2 cups sweetened, flaked coconut
2 cups (8 ounces) chopped pecans, optional


Directions
Preheat oven to 350 degrees F. 

In a large mixing bowl, beat the margarine and shortening on medium speed until smooth and creamy, about 2 minutes. Gradually beat in the sugars and continue to beat until light and fluffy, scraping the bowl as necessary, about 3 minutes. Add the eggs one at a time, beating well after each addition. Beat in the vanilla extract. 

In a medium bowl, whisk together the flour, baking powder, baking soda, cinnamon and salt. Reduce the mixer speed to low and gradually add the flour mixture, mixing until just combined. With a wooden spoon or large rubber spatula stir in the chocolate chips, oats, coconut and pecans.

For JUMBO cookies, drop ¼ cup dough onto the baking sheets, spacing them about 3 inches apart (for the extra large cookies). Bake until the edges are set but the middles still look light and puffy, about 12-15 minutes, rotating the sheets halfway through. Cool cookies on the baking sheets.

OR

For REGULAR sized cookies,  drop approximately 2 Tbsp dough (use a cookie scoop/mini ice cream scoop) on the cookie sheet, spacing one inch on each side. Bake 8-10 minutes until edges are golden brown. The center will not looked completely set. Cool on baking sheet for 2-3 minutes. Remove to wire rack to cool completely.