Monday, February 28, 2011

Slow Cooker Hearty Ham and Bean Chili

Come visit the new Adorkable Recipes Facebook Page! It's the perfect place to connect and get the latest on kitchen news.
----------

IMG_5046

This should probably be called "Ham and Bean Soup," but being the wise woman that I am, I knew better. My husband would judge a dish in very negative light if it had the word "bean" in the title. He'll eat chili and he now loves refried beans in taco dip and he goes wild for the black bean salsa, but he'll still tell you he doesn't like beans. I just smile and nod. And continue to make dishes with beans--because I love beans and beans are good for ya. 

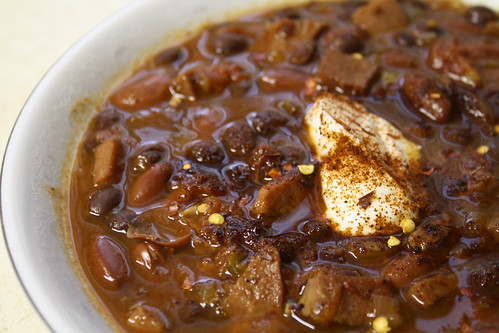
While this dish was filling my home with magical aromas, I created a new title--Hearty Ham and Bean Chili (only I left out the word "bean" when announcing the dish to my husband.) There were no complaints from his side of the table, I got to use up the leftover ham in my fridge, and this went together in the crockpot in less than 7 minutes. Not too shabby.  


IMG_5048


Hearty Ham and Bean Chili
recipe by adorkablerecipes.blogspot.com with inspiration from bettycrocker.com
Serves 4-6 

Ingredients
1- 15 oz can black beans, drained and rinsed
1- 15 oz can kidney beans, drained and rinsed
1- 14.5 oz can stewed tomatoes
1-1/4 cup chicken broth or bouillon
1 cup diced, cooked ham
1 small onion, finely chopped
2 cloves garlic, minced
2 tsp chili powder
1 tsp Italian seasoning
1/4 tsp black pepper

Directions
Mix all ingredients into a 4 quart slow cooker and stir to combine. Cook on high 3-4 hours.

----
Never miss a recipe. Subscribe.

Saturday, February 26, 2011

Mint Chocolate Chip Ice Cream

IMG_2955

This is my all-time FAVORITE ice cream flavor, bar none. This recipe is so pure and simple, I have to restrain myself from making it every week. :)


Mint Chocolate Chip Ice Cream 
recipe by adorkablerecipes.blogspot.com
Yields: 1-1/2 quarts (14--1/2 cup servings)

Ingredients
1 cup whole milk
3/4 cup sugar
2 cups heavy cream
1 tsp pure mint extract
1 cup mint chips or chocolate chips 

Directions
In a medium mixing bowl, use a hand mixer on low speed to combine the milk and sugar until the sugar is dissolved--about 1 to 2 minutes. Stir in heavy cream and mint extract.

Turn the machine on; pour the mixture into the (frozen) freezer bowl, and let mix until thickened--about 20 to 25 minutes. Pour in mint or chocolate chips and let combine for 5 minutes. The ice cream will have a soft, creamy texture. If a firmer consistency is desired, transfer the ice cream to an airtight container and place in freezer for about 2 hours. 

Friday, February 25, 2011

Facebook!

Adorkable Recipes is now on Facebook! Click HERE to check it out! I'd love to have you as a fan. :)

Thursday, February 24, 2011

Wheat Pita Bread

IMG_0965

I love a piece of soft, flavorful pita bread. It's the perfect palate for so many uses--sandwiches, dipping, baking into chips, munching. This recipe is so easy once you've conquered your intimidation of yeast, you'll never want to go back to the store bought variety ever again. :)

Whole Wheat Pita Bread
recipe by annies-eats.com
Yields: 8 pitas

Ingredients
2-1/4 tsp instant yeast
1 Tbsp honey
1-1/4 cups warm water (105˚-115˚ F), divided
1-1/2 cups bread flour, divided
1-1/2 cups whole wheat flour, divided
1/4 cup extra-virgin olive oil
1 tsp salt
Cornmeal, for sprinkling

Directions
In the bowl of a stand mixer (or in a bowl by hand), combine the yeast, honey and ½ cup of the water.  Stir gently to blend.  Whisk 1/4 cup of the bread flour and 1/4 cup of the whole wheat flour into the yeast mixture until smooth.  Cover the bowl with plastic wrap and set aside until doubled in bulk and bubbly, about 45 minutes.

Remove the plastic wrap and return the bowl to the mixer stand, fitted with the dough hook.  Add in the remaining 3/4 cup of warm water, 1-1/4 cups bread flour, 1-1/4 cups whole wheat flour, olive oil and salt.  Knead on low speed until the dough is smooth and elastic, about 8 minutes.  Transfer the ball of dough to a lightly oiled bowl, turning once to coat, and let rise in a warm draft-free place, about 1 hour, until doubled in bulk.

Place an oven rack in the middle position.  Place a baking stone in the oven (if using) and preheat to 500˚ F.

Once the dough has risen, transfer to a lightly floured work surface, punch down the dough and divide into 8 equal pieces.  Form each piece into a ball.  Flatten one ball at a time into a disk, then stretch out into a 6½-7 inch circle.  Transfer the rounds to a baking sheet or other work surface lightly sprinkled with cornmeal.  Once all the rounds have been shaped, loosely cover with clean kitchen towels.  Let stand at room temperature for 30 minutes, until slightly puffy.

Transfer 4 pitas, 1 at a time, onto the baking surface.  (Note: These can be baked on a baking stone or directly on the oven racks.) Bake 2 minutes, until puffed and pale golden.  Gently flip the pitas over using tongs and bake 1 minute more.  Transfer to a cooling rack and let cool completely.  Repeat with the remaining pitas.  Store in an airtight container for up to 3 days.

Tuesday, February 22, 2011

Spiced Banana Cake with Banana Frosting

IMG_4310

If you love banana bread, you will love this cake. It has the perfect moist factor, the perfect density, the perfect banana flavor, and the perfect sweetness. It's just wonderful.

IMG_4323
Spiced Banana Cake
recipe by adorkablerecipes.blogspot.com
Serves: 12

Ingredients
2-1/4 cup flour 
1-1/2 tsp baking soda
1 tsp baking powder
1 tsp salt
1/4 tsp nutmeg
1/2 tsp cinnamon 
1/2 cup unsalted butter, softened
1-1/4 cup sugar 
2 tsp vanilla
2 large eggs
1/4 cup sour cream
3 medium bananas, mashed 
1/2 cup buttermilk*

*or combine just under 1/2 cup milk with a little less than 1 Tbsp lemon juice and let sit for 5 minutes.

Directions
Preheat oven to 350 degrees. Prepare 2-9 inch pans by greasing with shortening and dusting with flour. Set aside. 

In a medium bowl, whisk together flour, baking soda, baking powder, salt, nutmeg and cinnamon. Set aside.

In a second large mixing bowl, beat together butter and sugar until light and fluffy. Add vanilla and eggs and beat until combined. Stir in sour cream and bananas. While the mixer is running, pour in buttermilk in a slow steady stream. 

Then, in 3 separate additions, stir in flour mixture into the wet ingredients. Stir until just combined. Do not over-mix.  

Divide batter evenly between the two prepared pans. Place in the center of the oven and bake for 20 minutes. Check on the cakes at this point. (Mine cooked quickly and were finished at this time). If still loose and runny in the middle return to the oven for 7-10 minutes or until cooked thoroughly (when tops are golden brown and a toothpick inserted into the center of the cakes comes out clean.)

Remove from the oven and place on a wire rack to cool for 10 minutes. After 10 minutes, turn cakes out onto the wire rack to cool completely. (right side up.)  

Banana Frosting
Ingredients:
1/4 cup unsalted butter, softened
1/2 cup banana, mashed (about 2)
1/2 tsp lemon juice
1/2 tsp vanilla
3-1/4 to 3-3/4 cup powdered sugar

Directions
In a large mixing bowl, mash bananas. Add butter and beat until fairly smooth. Stir in lemon juice and vanilla. One cup at a time, beat in powdered sugar until desired consistency is reached. Spread on cooled cake. 

-------
Don't miss a recipe. Subscribe.

Sunday, February 20, 2011

Light and Crispy Waffles

STP64775

I love pancakes. My husband prefers waffles. But after whipping up a batch of these on a lazy Saturday morning, I may be changing (or at least sharing) my allegiance to the starchy breakfast food category. These waffles are everything I love about a good waffle--lightly crisped and slightly crunchy on the outside, while perfectly moist and airy on the inside. Top with your favorite syrup or a smorgasboard of fruits and whipped cream, and you've started your day off right! 

Light and Crispy Waffles
recipe adapted from annies-eats.com
Makes about 6 waffles. 

Ingredients
3/4 cup all-purpose flour
1/4 cup cornstarch
1/2 tsp baking powder
1/4 tsp baking soda
1/2 tsp salt
1-1/2 tsp sugar
1/2 cup milk
1/2 cup buttermilk*
1/3 cup vegetable oil
1 large egg, lightly beaten
3/4 tsp vanilla extract

*Make your own buttermilk: Combine just under 1/2 cup milk plus 1/2 Tbsp lemon juice. Let sit for 2-5 minutes.

Directions
In a medium mixing bowl, combine the flour, cornstarch, baking powder, baking soda, salt and sugar.  Whisk together to blend.  In another mixing bowl, beat together the whole milk, buttermilk, oil, egg and vanilla.  Add the dry ingredients to the bowl with the wet ingredients and whisk just until incorporated and few lumps remain.  Set aside to rest for 30 minutes.

Preheat a waffle iron.  Fill waffle wells and cook according to the manufacturer’s instructions.  Cook until crisp and golden.  Serve immediately.

---------


Don't miss a recipe! Subscribe.

Friday, February 18, 2011

Perfect Pizza Crust: Revisited

IMG_4255

I've made a few different pizza crusts in the past, and for the last year or more I have resorted to the bread machine variety. It worked well and it was super easy. But today I decided we needed something new--something AMAZING. This was definitely the right recipe to choose. Though I had attempted this same recipe in 2009, I wanted to give it another try. I am so glad I did. 

IMG_4261

The crust was out of this world! It was crisp on the bottom and cooked thoroughly, yet thick and soft and moist. Our bread machine crusts always turn out delicious, but very crisp all the way through. If I lowered the baking time, the crust was uncooked in the center which did not make me very happy. 

This recipe solves all of those problems and results in a homemade pizza that far exceeds your favorite restaurant variety. And the best part is, you can do the work once, and freeze the extra dough for later!

IMG_4262

Basic Pizza Dough
recipe adapted from Annies-eats.com
Yields: 3 medium or 2 large pizza crusts

Ingredients
1/2 cup warm water (about 110°)
2-1/4 tsp instant yeast
1-1/4 cups water, at room temperature
2 Tbsp canola oil
4 cups flour, plus more for dusting
1-1/2 tsp salt
olive oil or non-stick cooking spray for greasing the bowl

Directions
Measure the warm water into a 2-cup liquid measuring cup.  Sprinkle in the yeast and let stand until the yeast dissolves and swells, about 5 minutes.  Add the room temperature water and oil and stir to combine.  

Place the flour and salt in the bowl of a stand mixer fitted with the paddle attachment.  Briefly combine the dry ingredients at low speed.  Slowly add the liquid ingredients and continue to mix at low speed until a cohesive mass forms.  Stop the mixer and replace the paddle with the dough hook.  Knead until the dough is smooth and elastic, about 5 minutes.  Form the dough into a ball, put it in a deep oiled bowl, and cover with plastic wrap.  Let rise until doubled in size, about 1 ½ to 2 hours.  Press the dough to deflate it.

To bake, place a pizza stone in the lower third of the oven.  Heat the oven to 500° for at least 30 minutes.  Turn the dough out onto a lightly floured work surface.  Divide the dough into two equal pieces.  Form both pieces of dough into smooth, round balls and cover with a damp cloth.  Let the dough relax for at least 10 minutes but no more than 30 minutes.

Working with one piece of dough and keeping the other covered, shape the dough and transfer to a pizza peel or round of parchment dusted with semolina or cornmeal.  Top as desired.  Slide the dough onto the pizza stone.  Bake until the crust edges brown and cheese

Wednesday, February 16, 2011

Slow Cooker Chicken Noodle Soup

IMG_4169

You won't believe it. But it's true. This is the first time I've ever made chicken noodle soup. I KNOW, right? Moving past the initial shock of MOI putting off THIS recipe for so long, let's take a minute and experience the glorious qualities of chicken noodle soup. 

It's warm. 
It's hearty. 
It's healthy. 
It's everything that makes you think of "home."

My favorite form of chicken noodle soup is not one of the broth-heavy types. That genre of soup is perfect for cold and flu season, but if I want a bowl of soup, I want some consistency, you know? So I filled my pot full of vegetables and chicken, and finally, the perfect amount of noodles. The result was exactly what I love--and everyone else loved it too (we shared with our small group.)

Slow Cooker Chicken Noodle Soup
serves: 6-8 

Ingredients
5 cups chicken broth (or bouillon)
5-6 cups water
2 cups carrots, sliced thin
1 cup celery, sliced thin
1 small onion, finely chopped
2 garlic cloves, minced
2 tsp parsley flakes
1/2 tsp dried basil
1 tsp pepper
2-3 lbs boneless skinless chicken breast
1 cup dry egg noodles

Directions
Mix all ingredients except the noodles into the crockpot pot. Keep chicken breast whole (or use pre-cooked, cut up or shredded chicken) and cut up or shred before adding in noodles during the last 30 minutes of cooking. Cook on high 4 hours, then turn to low until ready to serve. 

Monday, February 14, 2011

Italian Pizzelles

IMG_4234


Fact. I am one fourth (1/4) Italian.
Fact. You would never know it aside from the foods I make and eat and the way I do so. 
Fact. My dad's family is very Italian. 
Fact. I grew up in a town where at least half of the population is Italian.
Fact. I never knew the quirks of my life and my town and my family were quirks until I moved away. 

Ok, now that you have the facts, I would like to introduce to a cookie that is a staple for Italian families and Italian towns. These tasty, light, crispy waffle cookies are in every grocery store and in a tin on the counter of every Italian family. That's just the way it is, and frankly, I like it that way. 

I give you the Pizzelle
(prounced with a "tz" as in "pizza." It's pitzelle not pizzzzzelle.)

IMG_4233

Italian Pizzelles
recipe adapted from Cuisinart Pizzelle Press recipe book
Yields: 36-40 pizzelles

Ingredients
1-3/4 cups all purpose flour
2 tsp baking powder
3 large eggs
3/4 cups sugar
1/2 cup unsalted butter, melted
1 Tbsp vanilla or anise extract (or combination)


Directions
Preheat the pizzelle press. 

In a small bowl, stir together flour and baking powder. Place eggs and sugar in a medium bowl and mix together on medium speed for 1 minute, until thickened. On low speed, add the melted butter and the extract in a steady stream. Mix until combined. Add the flour mixture and mix just until combined (about 10-15 seconds)--do not overmix.

If necessary, lightly grease the top and bottom girds of the pizzelle press. Use a 1 Tbsp cookie scoop (or spoon) to drop dough onto one of the grids and then the other. (Dough should be dropped just slightly above center.) Close and lock the lid (you will need to press down to do this.) Bake 1 to 2 minutes or according to manufacturer's directions. 

Pizzelle is cooked when it is very lightly browned. Cookie will still be soft and pliable.
Remove pizzelle from the press using a heat-safe plastic spatula and place on a cooling rack to cool completely. 

Additionally:
  • Warm pizzelle may be wrapped around a thick dowel to form cannoli shells or wrapped around a waffle cone form. 
  • Cooled pizzelles maybe be dusted with powdered sugar before serving, if desired.


IMG_4213

IMG_4209

IMG_4226

IMG_4219

IMG_4227

Subscribe to my Recipe Feed and don't miss a post!

Saturday, February 12, 2011

Taco Layer Dip {low fat}

IMG_4089

It was Super Bowl Sunday. It was also just hours after saying good to the last student after a weekend of leading a trip of 27 to a youth conference. We were tired. We wanted rest and relaxation. And we wanted a private party chock full of delicious Super Bowl snacks. While Kevin cooked up store-bought fried ravioli, I went to work on this low fat dip of awesomeness. 

I have seen many varieties of this dip, so I went with my own instincts and created this delicious dip. I would highly recommend including a layer of homemade guacamole--it tips the scales to make this appetizer/snack/meal over-the-top perfect. 

Kevin has always claimed to strongly dislike refried beans, but after adding the additional spices and layering with fresh ingredients, he couldn't get enough--and neither could I. This is one appetizer that's downright healthy. With the low fat ingredients chock full of protein and fiber, combined with fresh vegetables, you can't be it! 
IMG_4101

Taco Layer Dip {low fat}
serves: a party!

Ingredients
1 - 15 oz. can fat free refried beans
1/4 cup water
1 tsp chili powder
1/4 tsp cumin
1 jalapeño peppers, finely chopped (seeds and ribs removed to lower heat)
1 avocado, finely chopped OR 1 cup fresh guacamole
1 cup finely chopped tomatoes, divided
1/4 cup red onions, finely chopped
1 cup fat free sour cream 

Directions
In a medium bowl, stir together beans, water, chili powder and cumin until smooth and creamy.* Spread the beans along the bottom of a 9 inch pie plate (or other serving dish). Layer on jalapeno, avocado (or guacamole), tomatoes (reserving a few for garnish), and onions. Spread with sour cream. Garnish with additional tomatoes. 

Serve immediately with tortilla chips or cover and refrigerate. 

*Optional: Beans may be heated, topped with cheese then spread with remaining ingredients for a warm appetizer (or if you just plain prefer your refried beans hot).

Thursday, February 10, 2011

Monte Cristo Sandwiches

IMG_4123

With a new package of delicious black forest ham alongside the swiss cheese in my fridge, I had the brilliant idea to make Monte Cristo sandwich for a different take on dinner. It was a good idea, let me tell you. Traditionally, the Monte Cristo is a ham and swiss sandwich dipped in egg batter and fried. I knew I wanted to avoid the frying and take the grilling route. It was DElish and super easy! Your whole family will love you for serving this sandwich--for breakfast, lunch or dinner!

IMG_4108

Monte Cristo Sandwiches
serves 2 

Ingredients
4 slices whole wheat bread (or other variety)
2 slices Swiss cheese 
10 thin slices (~ 4 oz) black forest ham
2 large eggs
1/4 cups skim milk 
1/4 tsp cinnamon 
Syrup, strawberry or raspberry jam, Thousand Island Dressing or other dip of choice

Directions
Hit a non-stick skillet or griddle over medium low heat. Layer the ham and cheese inside two slices of bread. In a separate shallow bowl, beat 2 eggs and then beat in milk and cinnamon. 

Dip the built sandwich into the egg mixture, coating thoroughly on both sides (but not letting the bread soak). Place the sandwich on the griddle and cook 3-5 minutes on each side, or until evenly browned. 

Serve with a side of syrup, jam or dressing for dipping. 

Tuesday, February 8, 2011

Fresh Guacamole

First of all, I must apologize for the poor appearance of this guacamole. I misread the directions and mashed all of the ingredients together at the same time--resulting in smushed tomatoes throughout the beautiful green avocado (aka--not pretty.) 

IMG_4079

Besides the slight discoloration of this dip, the flavor is OUT OF THIS WORLD. I love the fresh ingredients, the purity of the combination, the ease of preparation. I would have loved to wait to post the recipe with a prettier appearance, but it's just too good to put off. 


Ingredients
2 ripe avocados (how to find the right avocado)
1 Tbsp lime juice
1/4 cup onion, minced
1-2 cloves garlic, minced
1 jalapeño pepper, minced (seeded to lessen heat)
1/4 tsp chili powder
1/2 tsp salt
pepper, to taste
1/4 cup tomatoes, seeded and diced

Directions
Cut the avocados in half, remove the pit and scoop the flesh into a medium-size bowl. Using a fork or a potato masher, mash the avocados to the consistency that you desire. Mix in the lime juice, onion, garlic, jalapeño, chili powder, salt and pepper (not tomatoes!). Taste and adjust the seasoning to your liking. Gently stir in the tomato.

If desired, you can garnish the guacamole with chopped fresh cilantro. If not serving immediately, cover with plastic wrap, pressing the plastic wrap against the dip, and refrigerate.

Sunday, February 6, 2011

Cake Balls Basic Recipe

IMG_3634

I have been hearing and reading about cake balls for quite some time now. Bakerella has made it her life's work to create beautiful cake pop designs out of these little dessert balls. (Please check out her work.) This past week I borrowed Bakerella's new Cake Pops from the library, and I knew I had to give it a try. 

I had baked brownies from scratch for Kevin and I to have a perfect topping for ice cream. Unfortunately, my experimental attitude in the kitchen resulted in something much more cake-like than brownie-like. We had about half of the cake-ish dish remaining, and I wanted to see if this cake ball craze was really worth it. 

These things totally rock.

Cake. Mixed with frosting. Coated with chocolate. 

Yes, please.

Even my husband--the man who doesn't like cake or frosting at all--LOVES these.

I'm not sure I'll ever be able to create such intricate designs like Bakerella's, but heck! I think I can impress a few people with these little dessert delights.  

IMG_3645

Cake Balls
makes 48 cake balls. 
Recipe by Bakerella.com

Ingredients
1 box cake mix of your choosing 
3/4 can frosting (16 oz.)
2 pounds candy coating (color/flavor of your choice)
wax paper

Directions
Choose your favorite boxed cake mix and bake the cake as directed, using a 9x13 inch pan. Once the cake is cooked and cooled completely*, crumble finely into large bowl. Mix thoroughly with 3/4 can frosting of your choice. Using the back of a large metal spoon, stir until smoothly incorporated. It will take time, but it will come together.

Using a small cookie scoop or eyeballing it with your fingers, roll the cake/frosting mixture into quarter size balls and place on cookie sheet. (Should make 45-50.)

Freeze for approximately 20 minutes. 

Melt chocolate** in microwave per directions on package or heating for 30 seconds, stirring, heating for 30 seconds, stirring and repeated until smooth. (Be sure not even a drop of water gets into the chocolate or it will seize up.)

Take a few cake balls at a time out of the freezer to work with. Transfer the remaining balls to the fridge so they stay firm but do not freeze. Place one ball at a time into the bowl of candy coating. Spoon extra coating over any uncoated areas of the cake ball. Life out the cake ball with a spoon. (Avoid stirring the ball in the coating to keep crumbs from falling into the coating.

Holding the spoon over the bowl, tap the handle several times on the edge of the bowl to allow excess coating to fall back into the bowl. Slide the cake ball onto a waxed paper lined baking sheet and allow to cool and set completely. 

Notes: 
*If you do not need or want 48+ cake balls, you can cut the cooled cake in fourths, wrap and freeze for later use. Be sure to decrease frosting proportionally. 


**You may want to melt 1/4 or 1/2 of the full candy coating at a time, because it starts to cool and thicken. It’s easier to work with when it’s hot.