Tuesday, March 24, 2009

Enchiladas with homemade sauce

Kevin loves enchiladas and I had yet to fix some for him, so last night I set out to right that situation.  I had a couple enchilada recipes but they just weren't cutting it for me.  I didn't feel like loads of sour cream and other fattening ingredients to make this Mexican dish, so I went on a search and came up lucky!  This is a simple sauce recipe and you can add or subtract ingredients at will.  I made my own tweaks and this is what I came up with.

  • Vegetable oil
  • 2 tablespoons self-rising flour OR corn starch (I used corn starch because well, you know...)
  • 1/4 cup New Mexico or California chili powder (I used a Taco seasoning & chili powder combination)
  • 1 (8 ounce) can tomato sauce
  • 1 cup water
  • 1/4 teaspoon ground cumin
  • 1/4 teaspoon garlic powder OR 2-3 cloves freshly minced garlic (I bet you can guess what I used!)
  • 1/4 teaspoon onion salt OR 1/4 cup freshly chopped onion
  • 1/4 cup chopped green pepper
  • 3 jalapeno rings, diced
  • salt to taste
  • 1 large boneless skinless chicken breast, cut into small bite-sized pieces 
In a medium sauce pan, begin heating oil (2 or 3 turns around the pan) over medium heat .  Add in fresh garlic, green pepper, and onion.  Stirring occasionally, let the flavors come together and allow the vegetables to soften (approximately 5 minutes).  Add in jalapenos.  In the mean time, cook the chicken pieces on a skillet over medium heat until no longer pink inside.  Returning to the sauteed vegetables, add 1 Tbsp of cornstarch and mix thoroughly.  Pour in one can of tomato sauce and mix.  Add chili powder, taco seasoning, cumin and salt according to your personal preference (I didn't use exact measurements.)  Add one more Tbsp. of corn starch and stir thoroughly.  Add in 1 cup water.  Allow to heat through completely and allow the mixture to thicken.  Add small sprinkles of cornstarch until mixture is slightly thickened (it will still be fairly runny--like a taco sauce consistency.)  Add in chicken.  

Preheat oven to 350.  Grease an 8x8 in glass baking dish.  Fill the centers of soft corn or flour tortillas with the mixture.  Roll and place seam-side down in the baking dish.  Pour additional sauce over the enchiladas.  Bake for 15-20 minutes, or until heated through.  Sprinkle with colby or cheddar (or any) cheese, and bake another 5 minutes, until cheese is melted.  

Enjoy!  

Wednesday, March 11, 2009

Cornbread

I had never made cornbread without the Jiffy mix.  It just never occured to me to try it from scratch.  That was then.  This is now. :)  Not that I wouldn't use a mix ever again, but I'm glad I know how easy the from-scratch version is.  I hope you enjoy it!  Also, I've found a flour-free cornbread recipe that I plan on trying out and I'll let you know if it's any good.

1 cup milk
1/4 cup butter or margarine, melted
1 large egg
1 1/4 cups yellow, white or blue cornmeal
1 cup all-purpose flour
1/2 cup sugar
1 Tbsp. baking powder
1/2 tsp. salt


1.  Heat oven to 400 F. Grease bottom and side of 9 inch round or 8 inch square pan with cooking spray or shortening.
2.  In large bowl, beat milk, butter and egg with hand beater or wire whisk.  Stir in remaining ingredients all at once just until flour is moistened (batter will be lumpy).  Pour into plan.
3.  Bake 20 to 25 minutes or until golden brown and toothpick inserted in center comes out clean.  Serve warm if desired.  

I like it with butter.  Kevin loves honey.  Cornbread is perfect with chili or any soup!  

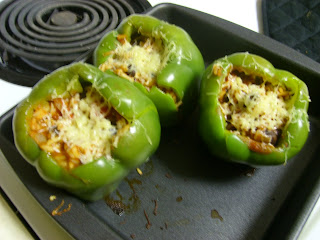
Stuffed Green Peppers


While my mom was visiting, we looked through a bunch of recipes and decided on Stuffed Peppers for dinner.  There were at least 4 different versions of this healthy meal, so I made up my own. 

1.  Preheat oven to 425 degrees.
2.  Clean 3 large green peppers then cut out the stem and clean out the insides and seeds.
3.  Using Minute Rice, microwave 1 cup rice in 1 cup water for 5 minutes, or until cooked.  (You may used "real rice" if desired.  cook according to directions.)
4.  Saute 1/4 C onions and 3 crushes garlic cloves in olive oil in a 10 inch skillet over medium heat.  
5.  Once onions are softened, add 2/3 of a can of black beans, Cooked white rice, and approximately 1 C pasta sauce (more or less depending on how moist or liquidy you would like the mixture.)  Heat thoroughly.
6. Transfer mixture into the cleaned green peppers.  Bake for 30 minutes or until peppers are softened.  Sprinkle with cheese and cook again for 5 minutes.  Serve with cornbread. (I was going to put the link to my cornbread recipe, but apparently I haven't added it yet.  That will be forthcoming.) 


Monday, March 9, 2009

Lemon Meringue Pie


Back at Christmas time, before heading to my parents' house for the holiday, I decided to bake mom and dad's favorite pies--lemon meringue & apple respectively. The apple turned out beautifully, and the lemon meringue looked great but was not at all a pie. It was more like liquid pie in a crust. What a bust! I had used corn syrup in place of the corn starch (which I had bought specifically for this pie no less...) Geez, Louise, I was sooo embarrassed. Anyways, with my mom's visit this week, I thought I'd give the Lemon Meringue pie another shot. It's terrific! (Though quite time consuming...about 2 hours start to finish!)

Lemon Meringue Pie
3 Large egg yolks (reserve egg whites for meringue)
1 1/2 C sugar
1/3 C plus 1 Tbsp. cornstarch
1 1/2 C water
3 Tbsp. butter or margarine
2 tsp. grated lemon peel
1/2 C lemon juice
2 drops yellow food color, if desired (I did not use this ingredient)

1. Start with the Never Fail Crust Recipe.

Fill 9 inch pie pan with the pastry dough and flute edges. Prick bottom and side of pastry thoroughly with fork. Bake @ 475 degrees 8 to 10 minutes or until golden brown. Cool on wire rack.

2. Heat oven 350 F. Complete Step 1 of Meringue for 9 Inch Pie.

3. While sugar mixture for meringue is cooling, in small bowl, beat egg yolks with fork; set aside. In 2-quart saucepan, mix sugar and cornstarch. Gradually stir in water. Cook over medium heat, stirring constantly, until mixture thickens and boils. Boil and stir 1 minute.

4. Immediately stir at least half of the hot mixture into egg yolks, then stir back into hot mixture in saucepan. Boil and stir 2 minutes or until very thick; remove from heat (Do not boil less than 2 minutes or filling may stay too soft or become runny.) Stir in butter, lemon peel, lemon juice, and food color. Press plastic wrap on filling to prevent a tough layer from forming on top.

5. Complete Step 3 of meringue recipe. Pour hot lemon filling into pie crust. Spoon meringue onto hot lemon filling. Spread over filling, carefully sealing meringue to edge of crust to prevent shrinking or weeping.

6. Bake about @ 350 for 15 minutes or until meringue is light brown. Cool away from draft 2 hours. Refrigerate cooled pie until serving. Store covered in refrigerator. (This pie is best served the day it is made. If refrigerated more than 1 day, filling may become soft.)


Meringue for 9-Inch Pie
1/2 C sugar
4 tsp. cornstarch
1/2 C cold water
4 large egg whites (note: this takes 1 more egg white than is left over from the separated eggs for the lemon portion)
1/8 tsp salt

1. Heat oven to 350 F.

2. In 1-quart saucepan, mix sugar and cornstarch. Stir in water. Cook over medium heat, stirring constantly, until mixture thickens and boils. Boil and stir 1 minute; remove from heat. Cool completely while making filling for pie recipe. (To cool more quickly, place in freezer about 10 minutes.)

3. In large bowl, beat egg whites and salt with electric mixer on high speed just until soft peaks begin to form. Very gradually beat in sugar mixture until stiff peaks form.

4. Spoon meringue onto hot pie filling. Spread over filling, carefully sealing meringue to edge of crust to prevent shrinking. Bake about 15 minutes or until meringue is light brown. Cool away from drafts.


Sunday, March 8, 2009

One Bowl Peanut Butter & Milk Chocolate Cookies


Just an hour before bedtime and after a super productive (and quite tiring) afternoon between church/potluck then youth group (which included the baking of a pie crust and making a successful lemon meringue pie which will be blogged about later),  I decided it necessary to whip up a batch of cookies in celebration of my mom's impending visit and because she and my husband are more than deserving of the bite-sized sugary goodness.  I am almost out of chocolate chips (thanks to my week's worth of snacking on them...) so I asked Kevin what non-chip cookie he would prefer.  He answered "peanut butter."  I decided to find a new recipe this time around.  One of the recipe blogs I enjoy had this concoction posted and seeing its ease and the use of peanut butter cup crumbles (which I've been needing to use up for a while now...), I decided to give it a try.  Now, I can't say how they taste at this moment, but they look perfect and delicious. :D  I'll let you know if my husband informs me otherwise. 

[This just in:  "That's an amazing cookie," says husband.]


4 tablespoons unsalted butter, room temp
1/4 cup brown sugar, packed
1/4 cup granulated sugar
1/2 cup extra crunchy peanut butter
1/4 teaspoon vanilla extract
1 egg
1/8 teaspoon salt
1/4 teaspoon baking soda
3/4 cup all purpose or white whole wheat flour (95 grams)
15 miniature peanut butter cups, frozen and chopped or 3-4 oz milk chocolate

Preheat oven to 350 degrees F.

In a mixing bowl, beat together butter and both sugars. You can use an electric mixer, but Anna used a spoon. (I did too.) Beat in the peanut butter, vanilla, baking soda and salt. Beat vigorously and thoroughly to distribute baking soda and salt, scraping sides as you go, then add the egg and beat just until it is mixed in. Add the flour and stir, do not beat, until it is absorbed, then mix in the cups.

Using a small cookie scoop (2 tsp) or a rounded teaspoon, drop dough onto two ungreased cookie sheets, 10-12 cookies to a sheet. Flatten tops slightly.  (I went ahead and used the fork criss-cross method--typical of peanut butter cookies.)  Bake on center rack, one sheet at a time for 12 minutes or until cookies appear set.

Makes 20-24 cookies


Wednesday, March 4, 2009

Southwestern Chicken/Chili

Yesterday morning I wanted to get a meal in the crockpot before leaving for work. (Yes I actually went to work yesterday...filling in at the office I worked for in December.) Anyways, I had two separate recipes I had been wanting to try--one from my pastor's wife for Arizona Chicken Chili and one from my mom for Southwestern Chicken. I was leaning more toward the latter recipe but didn't want to use all of our salsa up (because it's one of my few gluten-free foods in the house). So...I looked at the two recipes, decided which ingredients would work together, added a few of my own, and came up with this:


In 3-5 qt. crockpot combine:
1 can whole kernal corn, drained
1 can (15 oz.) black beans, drained & rinsed
1 can (14.5 oz) diced tomatoes
1 can (8 oz) tomato sauce
1 Tbsp. chili powder
1 tsp. cumin
5 jalepeno rings (only if you want spice)
3 garlic cloves, pressed
1/4 C. onion, chopped (more or less depending on your taste)

Stir that mixture thoroughly. Then place 2-3 small uncooked boneless skinless chicken breasts on top--coating lightly with the corn-tomato-bean mixture from below. (I defrosted one large chicken breast and sliced in half--made a lateral incision--leaving me with two thinner equal proportioned pieces.)

Cook on low for 7-8 hours or on high for 3-4 hours.
Sprinkle with cheese and serve with tortilla chips.