Showing posts with label Pie Crust. Show all posts

Friday, July 5, 2013

Red Raspberry Pie Recipe

IMG_7935

One of the biggest, most beautiful benefits of working at a Berry Patch is getting to pick as many berries as I desire. A.MAZING. I picked a quart of Red Raspberries to bring home to my dad, and when i mentioned this to him, he quickly requested a Raspberry Pie. "I don't have enough berries for that, Dad, sorry," I said.

But then I decided it wouldn't hurt to see how many cups of raspberries were in a quart. There was just under 6 cups - perfect (maybe a few too few ;)) for a pie.

I LOVE baking pies, so this was a perfect 4th of July afternoon activity for me.

Red Raspberry Pie Recipe
recipe adapted from Betty Crocker Cookbook
Makes 9 inch pie (8 servings)

Ingredients
2 crusts (1/2 recipe) Never Fail Pie Crust
1 cup sugar
1/2 cup flour
6 cups red raspberries
1 Tbsp butter

Directions
Preheat oven to 425 degrees. Make Never Fail Pie Crust. Line the bottom of a 9 inch pie plate with 1 pie crust.

In large bowl stir together sugar and flour. Pour over raspberries and stir gently so as to keep berries in tact.

Pour berry mixture into bottom crust. Dot with butter. Cut slits in the 2nd crust and place on top of berries. Seal edges.

Bake for 35-45 minutes, until crust is golden brown and juices begin to bubble through the slits in the crust.

Allow to cool at least 2 hours on a wire rack.


Subscribe to The Adorkable Recipes | Follow on Facebook. | Find me on Pinterest

Thursday, September 6, 2012

Rustic Peach Pie Recipe

IMG_1614
We had a large bowl full of fresh, beautiful peaches given to us from local fruit farmer friends who go to our church. Yum! We were eating as fast as we could, but we couldn't keep it. It was time for reinforcements--pie to the rescue! This lovely, rustic pie is simple to make and delicious to eat, especially if it includes a side of homemade (or not) vanilla ice cream

Rustic Peach Pie Recipe
recipe adapted from Betty Crocker Cookbook
Serves 6

Ingredients
for the crust:
2 cup flour
1/4 tsp salt
1 cup shortening
1/2 beaten egg
2-4 Tbsp water

for the filling:
7-8 medium peaches, peeled and thinly sliced
1 Tbsp lemon juice
1/4 cup flour
1/4 cup sugar
1/2 tsp cinnamon

Directions
In a large bowl, stir together flour and salt. Cut in shortening until the mixture resembles tiny crumbles. Stir in egg and a couple tablespoons of water until the mixture comes together and forms a nice ball. Separate into two pieces, reserving half for another pie. Roll out into a rustic round shape on a lightly floured surface and transfer to a baking sheet lined with parchment paper or a silicone mat.

In a separate bowl, stir together flour, sugar and cinnamon. In a large bowl toss peaches and lemon juice, and add in the dry ingredients. Arrange filling in the center of the pie crust. Fold up the edges over 1-1/2 to 2 inches of the filling, all the way around, pinching dough together to reinforce. 

Bake for 40 minutes until crust browned and fruit is cooked. Cool completely before serving.    


Sunday, December 18, 2011

Sweet Cherry Pie Recipe

CIMG2382

I was commissioned by my grandma to make a cherry pie. I learned there are two types of cherry pie--tart and sweet. I choose the sweet variety this time and can't wait to try the more traditional tart cherry pie at the next opportunity. The filling couldn't be any simpler and with that never fail pie crust, you've got a real winner here.

Sweet Cherry Pie Recipe

Ingredients
Top & Bottom pie crusts from the Never Fail Recipe 
1/2 cup sugar
1/4 cup plus 2 Tbsp cornstarch
6-8 cups sweet cherries (thawed, if frozen)

Directions
In a large bowl, combine sugar, cornstarch and cherries. Let sit 15 minutes. 
Preheat oven to 375 degrees. 
Place bottom crust in your 9 inch pie plate. Pour in cherry filling. Top with second crust and flute edges. 
Bake 45 minutes to an hour, until filling is bubbling and crust in lightly golden. (Cover edges of the pie crust with tin foil if needed.) 
Cool completely before serving.  


Friday, November 18, 2011

How to {Pie Crust}

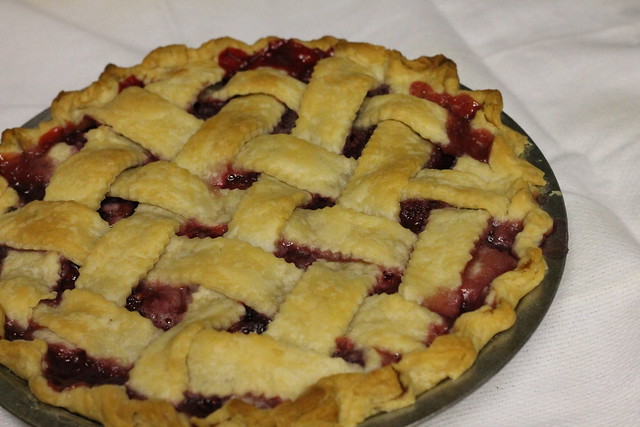
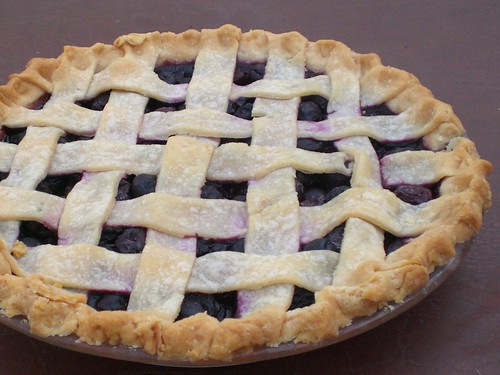
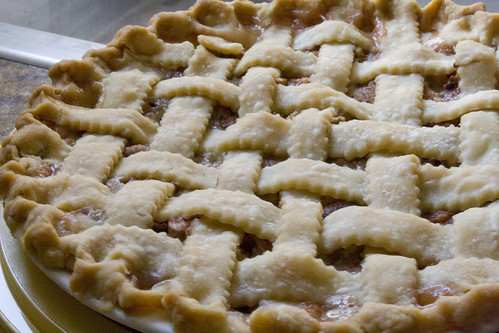
It's my favorite season of all--pie season! Ok, so maybe that's not an official season, but Thanksgiving and Christmas celebrations usher in pies of every kind--pumpkin, apple, pecan. Pie, glorious, pie! 

A few weeks ago, a friend from college gave me a call and wanted a bit of pie crust advice as she was baking up my Apple Pie with Streusal Topping. It occurred to me that I had a large whole in my pie recipes--the step by step pie crust directions. The pie crust is what keeps many people intimidated by pies. I consider pies one of my specialty and certainly one of my favorite forms of dessert. Everyone always raves about my pie crusts, so I am excited to equip of all you with the confidence you need to make awesome pies this holiday season! 

First of all, check out my Never Fail Pie Crust recipe. It seriously lives up to its name. 

Now, pull out your flour, the rolling pin your grandma passed on to you, and the completed pie dough. Roll up your sleeves, and let's get started!

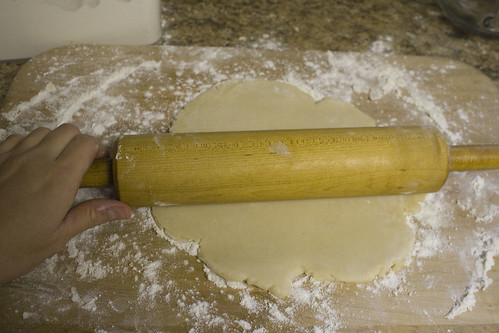
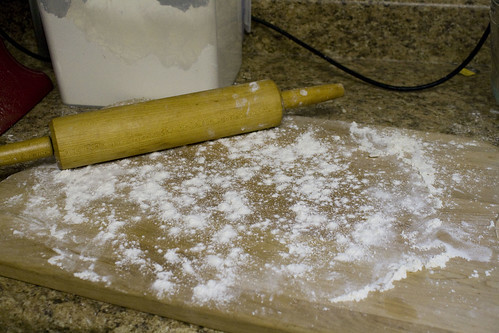
1) Dust your working space or (clean!) counter top with flour. You'll want your hands and rolling pin lightly dusted as well. 

443

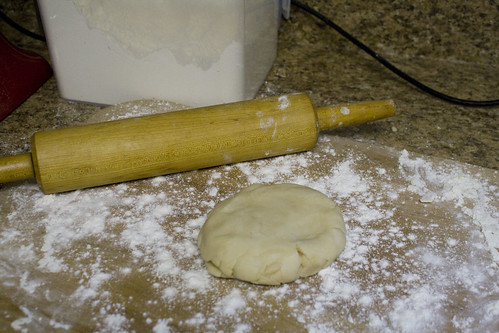
2) If you made the full Never Fail Pie Crust Recipe, you'll want to divide the dough into four equal parts (the recipe makes 4 single-crust pies or 2 double-crust pies.) Form each dough ball into a round flat-ish disc. (see how scientific I am about this?! flat-ish.)

444


see?! everything (even the dough ball) is lightly dusted. You don't want too much extra flour or the dough will start falling apart. The perfect amount of flour, however, will keep the dough from sticking and tearing.

445

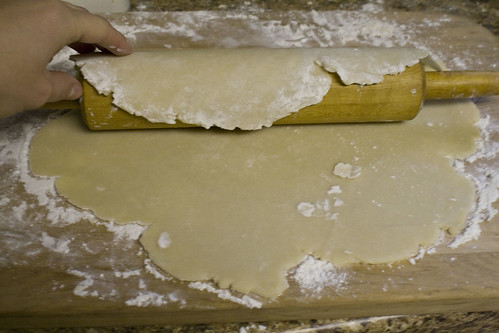
3) Gently begin to roll out the dough, working your rolling pin at every different angle to achieve a mostly-round pie crust. Don't be too freaked out if some of the edges begin cracking. You should have a wide enough circle to get rid of any mistakes. Roll out the dough to a 1/4 inch thickness.

446

4) Then comes the tricky part--the board to pie plate transfer. It's a risky move, but you can handle it, I promise! (and don't beat yourself up if it falls apart a time or two. It's good to have a few mistakes along the way to help you perfect your technique.)

There are two methods for transferring your pie crust. First, you can gently fold your crust in half, then in half again. (this is the way store bought crusts come.) Then, just pick up the little pie triangle and transfer it to your pie pan and unfold.

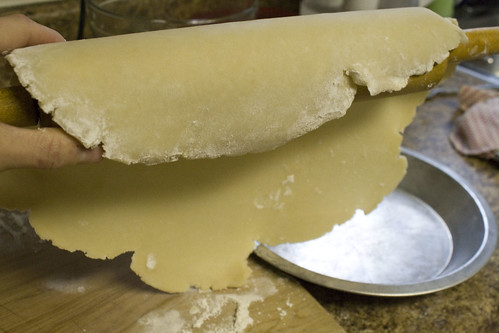
The second method that I prefer is the rolling pin transfer. It takes a bit more gentleness, but it keep those fold marks from occurring (more important in top-crusts than bottom-crust, of course.)

Lay your rolling pin at the edge of your crust and gently fold the crust over the rolling pin, peeling it slowly off of the rolling surface.

447

You can either roll the crust around itself OR just hang the crust over the rolling pin like this--

448

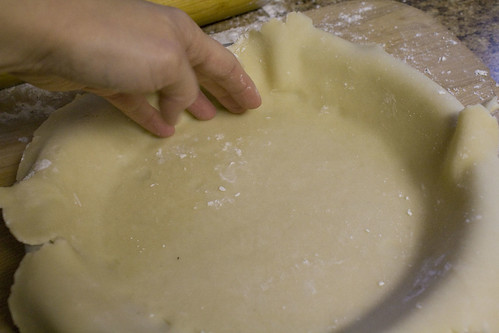
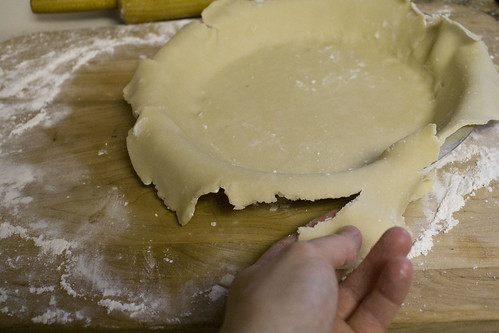
5) Once the transfer is complete, gently press the crust into the edges of your pie plate.

452

450

449

6) Now, work around the edge of the crust and remove the additional crust pieces (Save these for later--you can either bake them with a sprinkle of cinnamon sugar for a tasty snack OR make a small/mini pie crust out of the leftover crust pieces.) You should still have enough crust to cover the lip/edge of your pie plate and enough to flute.

453

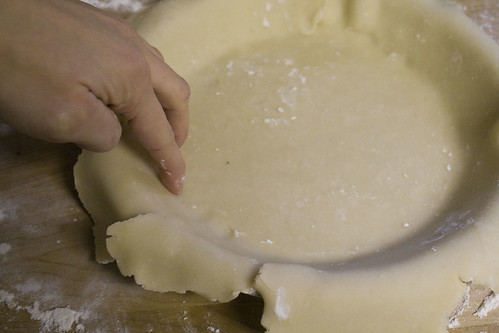
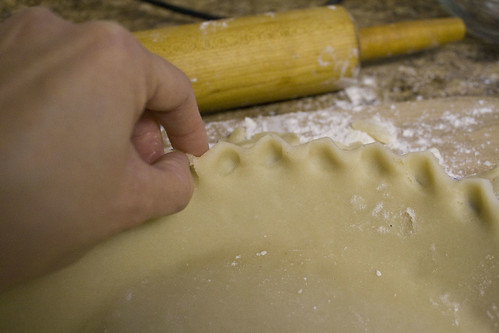
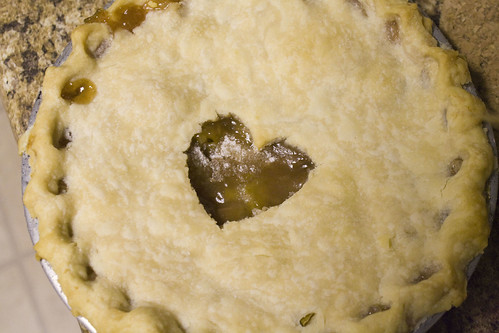
7) Now for the fluting! (If you're doing a two-crust pie, return to step 1 with your top crust and flute once both crusts are in place.) Don't take this too seriously--just have fun! You can simply use a fork and press it into the edges of your crust or you can have some fun and give fluting a try.

I am 99% sure I don't flute the "right" way--but it works for me.

I fold the "rough" edges underneath and then use my though to press a small section of dough in between my index and middle fingers. Like so:

454

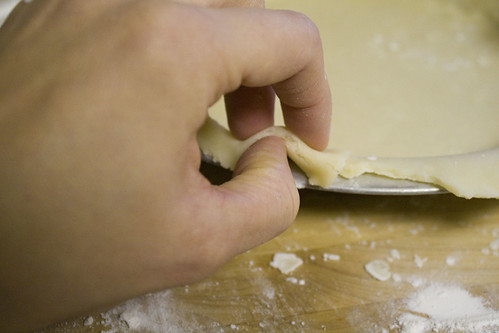
Work all the way around the pie.
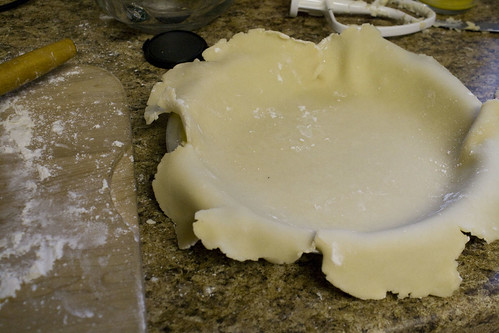
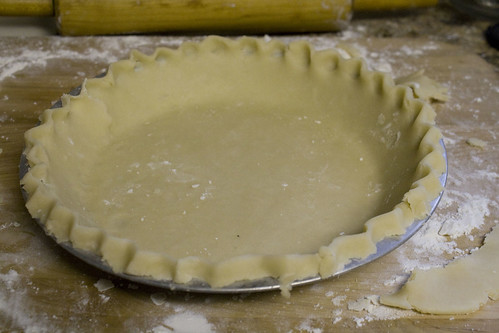
flute, flute flute.

455

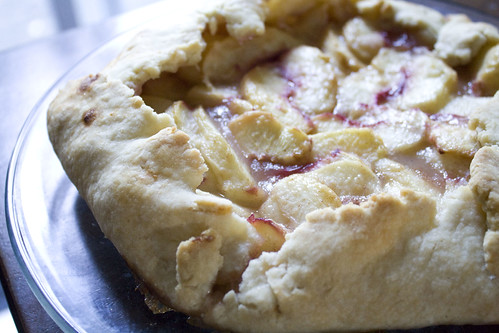
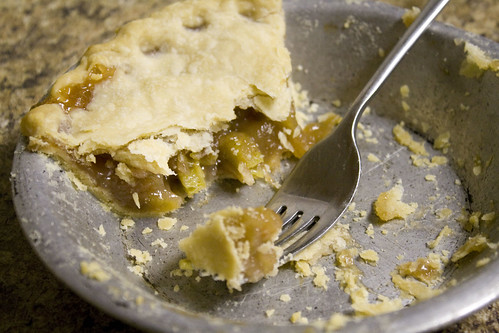
8) and VOILA! You'r done! Now fill your crust with your recipe of choice, bake and enjoy! (I don't bake my crusts before filling unless the recipe instructs otherwise.)

456

10) Now, this particular pie crust was an extra so I decided to freeze it. Very simple, and very awesome to find an already made crust when you want a last-minute pie. Simple cover the pie crust with aluminum foil and freeze. (For not much more than a couple months.)

457


Monday, October 24, 2011

Rhubarb Pie Recipe {my favorite pie EVER}

272

With my abundance of rhubarb and a women's dinner for 8 coming up, I decided to find myself a rhubarb pie recipe. I didn't have any strawberries on hand and since I had only ever heard of rhubarb being combined with strawberries to make a yummy pie, I thought I was out of luck. I mean, seriously, who would make a pie with only rhubarb in it?! I still didn't really know what rhubarb was all about, despite the muffins and sauce I had made, but I thought it was worth a shot. Kevin seemed confident. 

I'm so glad I followed his urging. This rhubarb pie is the best pie I've ever had in my entire life (and I've had a LOT of good pies!)  It has a texture similar to apple pie (many people were fooled into believing it was apple pie), but the rhubarb brings this lovely mixture of tart and sweet. You wouldn't believe how amazing this is. 

I'm so glad I made a mini pie for Kevin and I to taste test and enjoy the night before my little women's get together. We tried to only eat a quarter each, but we both had to go back for seconds!

275

Come join Love the Pie with TidyMom  sponsored by Cherokee USALe CreusetWilton,Bags by Bloom and  Harvard Common Press


271


Rhubarb Pie Recipe {aka my favorite pie EVER}
recipe adapted from allrecipes.com
Makes 1 whole (2 crust) pie

Ingredients
1/2 batch of the Never Fail Pie Crust (for top and bottom crust)
5 cups chopped rhubarb
1-1/3 cup sugar
6 Tbsp flour
1 Tbsp butter

Directions

Preheat oven to 450 degrees.

Combine sugar and flour. Sprinkle 1/4 of it over pastry in pie plate. Heap rhubarb over this mixture. Sprinkle with remaining sugar and flour. Dot with small pieces of butter. Cover with top crust. Flute edges to seal.

Place pie on lowest rack in oven. Bake for 15 minutes. Reduce oven temperature to 350 degrees and continue baking for 40 to 45 minutes. Serve warm or cold.

Thursday, June 16, 2011

Blackberry Streusal Pie

IMG_7527

With the abudance of fresh blackberries, I couldn't let the pie-making opportunity pass me by. I am so glad I made this pie. I sifted through 10 or 15 different blackberry pie recipes before coming to the conclusion I was going to need to create my own version. The part I was most concerned with was creating a thick enough berry filling--no one wants their pie running all over their plate. 

This is fast and easy to throw together--especially if you have a homemade pie crust frozen and ready to use. ;)  


Blackberry Streusal Pie
recipe by adorkablerecipes.blogspot.com
Serves 8-12


Ingredients
4-5 cups fresh blackberries, rinsed and dried
1 cup sugar
1/2 tsp salt
2 Tbsp flour
2 Tbsp corn starch

for the streusal
1/4 cup butter
1/3 cup brown sugar
1/4 cup flour
1/4 cup old fashioned oats
1 tsp cinnamon

Directions
Preheat oven to 400 degrees F.

In a large bowl, gently toss together blackberries sugar and salt. Add in flour and corn starch and fold together. 

In a separate bowl, cut together the butter, brown sugar, flour, oats and cinnamon until crumbly. 

Pour blackberry mixture into the bottom of a prepared (uncooked) pie crust. Sprinkle the streusal on top.  

Place pie on a baking sheet and bake for 25 minutes. Cover loosely with tin foil and bake another 25-35 minutes, until filling is bubbling and crust is golden brown. 

Let cool completely before serving.  

Wednesday, December 1, 2010

Never-Fail Pie Crust

This is the best, most trustworthy pie crust recipe ever. It has never failed me. It's easy to put together and crowds go wild over the flaky, melt in your mouth crust. The shortening in the key. I know, I know, butter is better. But not here, my friends. Trust me.

STP65093


Never-Fail Pie Crust
Makes two (2) two-crust pies (use only half of this recipe for one apple pie)

Ingredients
2 cups shortening (this is the key!)
4 cup flour
dash of salt
1 egg, beaten
1 Tbsp vinegar
1/2 cup cold water

Directions
Mix shortening, flour and salt with a fork or pastry blender or stand mixer until crumbly.
In a small bowl, mix together egg, vinegar, and water. Pour the liquid mixture into flour mixture. Mix with flour until dough forms. If dough is too wet to handle, sprinkle in additional flour and stir to combine.

After dough is complete, divide the dough into 4 equal parts (or 2 if you halved the recipe) and flatten each portion slightly into a circle (approx. 5 inch round).  Refrigerate for at least 30 minutes.  This allows for much easier rolling.

If you need additional tips for rolling out the dough, feel free to ask.  I've learned a lot of lessons!

While crust is chilling, start on your pie filling of choice and follow the pie recipe's baking directions.

Friday, October 1, 2010

Butternut Squash Pie

 I had three huge butternut squash sitting on my counter generously given to us by neighbors. Here's my thing about this vegetable--I really like the flavor, but the texture kills me. Butternut squash soup is delish, but it pretty much gags me. Sorry, but it's true. So I wanted a way to use the vegetable without the negative affects. What better way to do that than with a PIE?!

Just a couple weeks ago I saw a recipe for this pie and heard it tastes even better than pumpkin. The problem is I have NO IDEA where I read that. So I did a little googling and experimenting and came up with my own version.

I had one small crust (a mini crust really) on hand, so I just wanted to make a little bit of the filling. Turns out I had twice as much as I needed so I used biscuit mix with a little milk and patted it into the bottom of second mini pie plate. It didn't turn out too badly. :) All that to say, the measurements may be a bit off for a 9 inch pie, but because it filled two 4 inch pans, I think it might be just right.

::Baking the squash


Ingredients
1/4 of the dough from the Never Fail Pie Crust Recipe*--recipe below
*this is an approximation. I used the remnants of dough and made a miniature pie crust. The filling filled two mini pies, so I'm estimating. I believe this will make one 9inch pie. 

1 medium butternut squash, cooked and pureed
3/4 cup brown sugar
1 egg
1/4 cup heavy cream
less than 1 Tbsp butter, melted
3/4 tsp cinnamon
scant 1/4 tsp nutmeg
scant 1/4 tsp ginger
1/8 tsp cloves
1/4 tsp salt

Directions
Preheat oven to 400 degrees. Wash butternut squash and place on a plate. Microwave 2 minutes or until just soft enough to run a knife through. Cut squash in half lengthwise. Place cut side down on a baking sheet and add a small amount of water. Bake for 20-30 minutes or until fork tender. Remove from oven and let cool completely--1 hour.

Scrap out the seeds of the squash and discard. Using a spoon, scoop out the flesh of the squash, getting as close to the skin as possible without breaking through. Spoon into a food processor. Process until pureed and smooth. (I didn't need to add water, but you can if the squash isn't moving in the food processor.) 

Add to the processor the remaining ingredients. Pulse a couple times or until thoroughly combined. Pour into prepared pie shell. 

Reduce heat to 350 degrees. Place pie on a baking sheet and bake for 30-40 minutes or until knife inserted into the center of the pie comes out clean. (Be sure to line the crust with foil if it is browned but the pie is not finished baking. 


Never Fail Pie Crust
Makes two (2) two-crust pies (only need 1/4 of this recipe for this pie--freeze the rest!)

Ingredients
2 C. shortening
4 C. flour
dash of salt 

Directions
-mix the previous ingredients with fork until crumbly.
-in cereal bowl, mix 1 beaten egg, 1 Tbsp. vinegar, and 1/2 C. cold water.
-pour liquid mixture into flour.  Mix with flour until dough forms.

Helpful hint:  After dough is complete, divide the dough into 4 equal parts (or 2 if you halved the recipe) and flatten each portion slightly into a circle (approx. 5 inch round).  Refrigerate for at least 30 minutes.  This allows for much easier rolling.

Also, the crust I used for this pie had been in the freezer covered in foil (not even in a ziploc) for almost a year. It was still flaky and amazing!

Also, if you need additional tips for rolling out the dough, feel free to ask.  I've learned a lot of lessons!


Friday, October 23, 2009

Key Lime Pie & Graham Cracker Crust


This has always been one of Kevin's favorite desserts. Our very first Valentine's day together, we made dinner and this was our dessert. Though I'm pretty sure the pie was a total flop--it didn't set right for whatever reason--we still ate it and it still tasted scrumptious. Kevin & his brother's birthdays are 1 day apart and they are both big fans of cheesecake and key lime pie. Since we're having a big family party to celebrate both of them, I went ahead and made both!

The pie recipe comes from Kevin's mom and is super fast and easy to put together. Just be sure to note it needs a night in the freezer.

I had never made my own graham cracker crust--since it's so easy to get a store bought one for pretty cheap. But I figured, why not? Especially since I had a whole box of graham crackers on hand. The crust is simple to put together--even more so if you have a food processor and can use the machine for the grinding of the crackers as well as combining it with butter and sugar.

Next time, I might to add a couple drops of green food coloring--just for effect.

Key Lime Pie
9" Graham Cracker Crust (homemade or storebought)
3 large egg whites
14 oz. sweetened condensed milk
7 Tbsp lime juice

Beat egg whites until stiff. Gently fold in milk. Add lime juice. Pour into crust and freezeovernight. Top with whipped cream or cool whip if desired.


Graham Cracker Crust

This recipe is quick and simple, found in Betty Crocker Cookbook. Be sure to note the alternate cookie crumb crust.

Graham Cracker Crust
1-1/2 cups finely crushed regular or cinnamon graham crackers (about 20 squares)
1/3 cup butter or margarine, melted
3 Tbsp sugar

Heat oven to 350.
In medium bowl or food processor, combine all ingredients until well mixed. Reserve 3 Tbsp crumb mixture for garnishing top of pie before serving, if desired. Press remaining mixture firmly against the bottom and sides of a 9 inch glass pie plate. Use a ramekin or flat bottom measuring cup if necessary.

Bake about 10 minutes or until light brown; cool. Fill as directed in pie recipe.

For a cookie crumb crust:
Substitue 1-1/2 cups finely crushed chocolate or vanilla wafer cookies or gingersnaps for the graham crackers. Decrease butter to 1/4 cup; omit sugar.