Tuesday, December 28, 2010

Classic Meat Lasagna

IMG_1830

I'm proud of my Italian heritage. Almost everything I prepare starts with sauteing onions and garlic--a pretty good way to start any meal from the Italian perspective. Unfortunately, I had NEVER made a lasagna. Ok, that's kind of a lie. I've made Eggplant Lasagna and that was delish. But I've never attempted a classic meat lasagna. With my pastor's wife recovering from surgery, we thought this would be the perfect dish to bake and take to their family. Everyone loved it! This is a time-consuming meal, but it's not difficult and it's totally worth the effort!

IMG_1809

Classic Meat Lasagna
serves 6-8

Ingredients
12 lasagna noodles
1 pound ground beef or Italian sausage (or half and half) 
3 cloves garlic, minced
1 medium onion, diced
2 tsp parsley
2 tsp basil
2 tsp oregano
salt
pepper
1- 4oz can tomato sauce
1- 28 oz can whole tomatoes
15 oz ricotta cheese
10 oz frozen chopped spinach, thawed and drained/squeezed
1/2 cup Parmesan cheese
1 egg
1 cup grated mozzarella

Directions
Fill a large pot with water and bring to a boil. Add noodles and cook to al dente. 

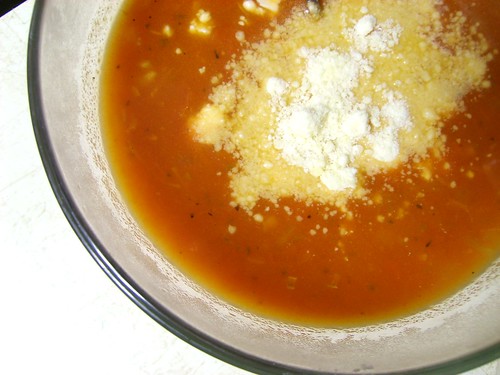
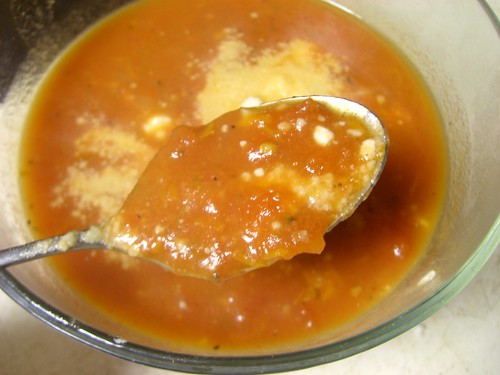
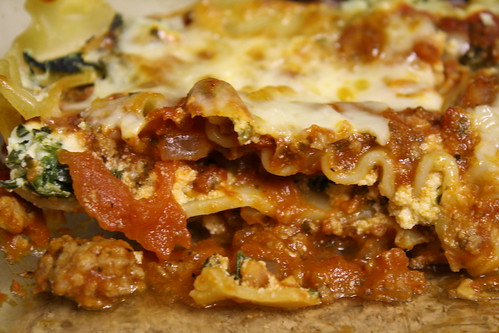
In the meantime, heat a large skillet over medium high heat. Brown the ground beef/sausage. Drain and rinse. Set aside. Wipe out the skillet, reheat over medium heat and drizzle with olive oil or canola oil. Saute onions and garlic until softened and fragrant. Stir in seasonings and cook a minute longer. Stir in meat, tomato sauce, and whole tomatoes (with their juices). Crush tomatoes with a wooden spoon or potato masher. Simmer 20-30 minutes. 

In a medium bowl combine ricotta, spinach, parmesan, and egg. 

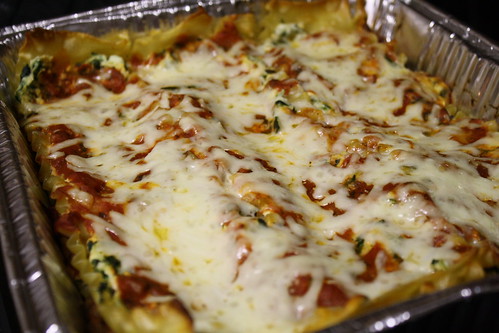
Heat over to 350 degrees. Coat a 9x13 inch pan with non-stick spray. Spread a thin layer of sauce on the bottom. Top with 3 noodles. Spread a 1/3 of cheese mixture on top of noodles. Top cheese layer with sauce, then noodles, then cheese, ending with the sauce mixture and topping with mozzarella cheese. Baked for 35-45 minutes, until bubbly and heated throughout. 

Friday, December 24, 2010

Chocolate Covered Butter Toffee

If it weren't for Sara's request to purchase my peanut brittle and to see if I could make chocolate covered toffee, I never would have tried this recipe from Pioneer Woman. I am SO glad I did. Besides having my candy thermometer break part way through cooking (thus having to hold the thermometer into the mixture with my hand instead of the handy dandy clasp) and accidentally touching my index finger into the 295 degree toffee mixture as I spread it onto the pan, it was a success! 

IMG_2561

Candy making it much more of a science than cookie baking, but if you use your trusty candy thermometer, you should be just fine!  This stuff is absolutely incredible. It's one of those things I have to slap my own hand in order to stop grabbing for another piece. YUM! And perfect for gifting too! :)

IMG_2557

Toppings are optional, but I would HIGHLY recommend the sea salt on half of the batch. Next time, I'll be trying almond slivers. :)

Also, please be sure to read through the entire recipe once or twice and have all of your equipment and ingredients ready to go. Candy happens quickly (and as I learned the hard way, can be quite painful) if you're not prepared. Be sure to have TWO lined cookie sheets ready!

Chocolate Covered Butter Toffee
recipe adapted from thepioneerwoman.com
Prep Time: 10 Minutes  
Cook Time: 30 Minutes  
Yields: 3 pounds

Ingredients
1 pound (4 sticks) butter, Melted
2 cups sugar
3 fluid ounces water
1 teaspoon salt
1 teaspoon vanilla extract
16 ounces, weight Chopped Topping: Toasted Nuts, Candy Canes, Sea Salt, Etc, optional
4 cups chocolate, melted (dark or combination of 3 cups semi-sweet and 1 cup unsweetened) (for coating)

Directions
*Necessary Equipment: Candy Thermometer*

Combine butter, sugar, water, and salt in a 3 quart saucepan. Bring to a boil, stirring constantly. Cook over moderate heat, stirring gently, until candy thermometer registers 298 degrees.

In the meantime, create a double boiler to melt the chocolate. (Boil 2 inches of water in a 2 quart sauce pan and place a 2.5 quart glass mixing bowl on top--do not allow the water to touch the bottom of the bowl. Reduce heat to medium-high and stir occasionally with a wooden spoon.)

Remove butter toffee mixture from heat and stir in vanilla until well combined.

Pour the toffee mixture onto a baking sheet lined with a silicone baking mat or good parchment paper. (You will need TWO cookie sheets!) Use a heatproof rubber spatula or offset spatula to spread quickly before the toffee sets. Spread thin--move quickly!!

Allow toffee to cool completely. Blot to remove excess oil from the surface. Coat surface with half of the melted chocolate and immediately sprinkle with topping.

When chocolate has totally set, carefully flip over (it’s okay if it falls apart a bit) and coat other side with the rest of the chocolate. Sprinkle on topping, if using. 

Allow to set, then break into bite-size pieces.
Store in an airtight container.

IMG_2565


Wednesday, December 22, 2010

Roasted Red Pepper and White Bean Dip

Everyone raved about this dip! It's super easy (just a bit time consuming if you decide to use dry beans) and totally worth it. It's mild, yet intriguing and could be spiced up even more to suit your taste. Kevin described this as a hummus, but even better. Try it! (You'll have enough to serve at least 2 parties. We did!)

IMG_2099


Roasted Red Pepper and White Bean Dip
recipe adapted from annies-eats.com
Yields: 4 cups of dip (a LOT)


Ingredients
2 cups dry white beans, such as cannellini or Great Northern
5 cups water
5 tbsp. chopped basil
¾ cup sweet marinated roasted red peppers
1/3 cup extra virgin olive oil
3 cloves garlic
½ tsp. salt
ground black pepper
1 tsp. crushed red pepper flakes
¼ tsp. nutmeg
1 tsp. dried oregano
1 tsp. sugar

Directions
Place beans in a large bowl.  Add water and soak for 6-8 hours.  In a large pot of water, bring the beans to a boil.  Turn the heat down and allow to simmer 45 minutes or until the beans are tender.  Remove from heat and drain.

Add the cooked beans to the bowl of a food processor.  Add all remaining ingredients and process until smooth.  Taste mixture and adjust seasonings as desired.

Monday, December 20, 2010

Homemade Peanut Brittle

I was really intimidated by peanut brittle. Mostly because the first time I tried to make it, I failed miserably. The candy didn't reach the right temperature because I didn't have a candy thermometer, and I didn't know what the mixture was supposed to look like either. It was basically peanuts covered in syrup. Not cool.

IMG_2065

This Christmas I decided to conquer my fear--and I'm so glad I did. This recipe from Brown Eyed Baker is absolutely perfect. One person who tried this peanut brittle said it was exactly like his mom used to make--a HUGE compliment, considering this woman is one of the greatest cooks I know.


Homemade Peanut Brittle
Yield: About 1½ pounds

adapted from browneyedbaker.com

Ingredients
Nonstick cooking spray
2 cups granulated sugar
1 cup water
½ cup light corn syrup
½ teaspoon coarse salt
2 tablespoons unsalted butter
½ teaspoon baking soda
3 cups salted dry-roasted peanuts (about 1 pound)

Directions
Line a rimmed baking sheet with parchment paper and lightly coat with cooking spray; set aside.

In a medium saucepan, combine sugar, water, corn syrup and salt. Bring to a rapid simmer over medium-high and cook until candy thermometer reads 300 degrees F and the color is deep golden, about 20 to 25 minutes. Remove pan from heat. Stir in butter, baking soda, and peanuts (mixture will foam). Stir until mixture is no longer bubbling and caramel is smooth, 1 minute.

Transfer to the prepared baking sheet and spread with a lightly greased spatula. Let cool until firm, 15 minutes. Break into pieces. The brittle can be stored in an airtight container at room temperature for up to 3 weeks.

IMG_2073


Friday, December 17, 2010

Orange Iced Cookies

This is the epitome of a family recipe. I have never seen this recipe or eaten these cookies anywhere else but at my Gram's house. She and Gramps used to make these cookies for us every Christmas. I have fond memories of a group of my aunts and uncles and cousins crowded the kitchen counter, eating these cookies for what seemed like hours. 
IMG_2032

It has been a few years since Grams made these cookies, and I thought it was about time I give it a try myself. I was really worried they wouldn't be as good as hers. You know how it is--anything from Grandma's house is always better. But you know what, these turned out amazingly well. Yes, I was in the kitchen from 10am to 3pm working on them, but it was totally worth it. Even Kevin loved them. He's not a cake or frosting fan, and these cookies embrace both of those descriptions. It must be something about the distinct orange flavor that keeps you coming back for more. 

Just be careful when zesting the orange peel. Near the end of job, I grated the knuckle of my thumb. LITERALLY. It was not a pretty sight folks. Safety first. (Either that, or have your husband do the grating. That's what Grams always did!)

IMG_2027
Ingredients
5 cups flour
4 tsp baking powder
1 tsp salt
1 cup shortening
2 cups sugar
2 tsp vanilla
1/3 cup grated orange peel
1/3 cup orange juice (can be squeezed from the zested oranges)
2 eggs
1-1/2 cup buttermilk (milk plus 1-1/2 Tbsp lemon juice)
2 tsp baking soda

for the icing:
3-3/4 cup unsifted confectioner's sugar
4 Tbsp margarine, softened
2-3 Tbsp orange juice
1/3 cup grated orange peel (more or less to taste)
1 Tbsp vanilla 

IMG_2024
Directions
In a large bowl, whisk together flour, baking powder and salt. Set aside. 
In a separate large bowl, cream together shortening, sugar, vanilla, grated orange peel, and orange juice. Add in eggs, one at a time, scraping the bowl with each addition. 
Mix together buttermilk and baking soda. 
Add buttermilk/soda mixture alternately with the flour mixture into the creamed ingredients. Beat well and scrape sides of bowl after each addition. Dough will be similar to the consistency of brownie batter. 

Chill dough 1 hour. 

Preheat oven to 350 degrees. Using a cookie scoop drop dough onto a cookie sheet, leaving 2 inches on all sides. Bake for 8-10 minutes, until bottom edges begin to brown. Remove from the oven and leave on the baking sheet 2 minutes. Finally, remove to a wire rack to cool. 

for the icing:
Beat together margarine, orange juice, orange zest, and vanilla in a large mixing bowl. Using a wire whisk (by hand or stand mixer attachment), stir in confectioner's sugar until perfectly smooth and combined. Spread a thin layer of icing onto cooled cookies. 

to freeze the frosted cookies:
Place frosted cookies in a single layer on baking sheets. Place in the freeze, uncovered for 1 to 3 hours, until frozen. Stack and store cookies in an airtight container in the freezer. 

Friday, December 10, 2010

Puppy Chow (aka Muddy Buddies)

I'm not sure how I've never made this sweet snack. Well, to be more exact, I'm not sure how I don't remember making puppy chow before. Kevin swears I made it for him a few years back and, at the time, said it was my first time making it. Hmm. This is a suspicious story I have. I'm just going to operate under the assumption that this was my first, since my mind must have had this memory erased.
IMG_0789

Puppy Chow/Muddy Buddies is an amazing snack combining my favorite things--chocolate. peanut butter. cereal. and butter. In under 5 minutes you have an enormous bowl of goodness to set out for your friends, family, and any other holiday guest. Just be sure not to set it out too soon. It will disappear. And you'll have powdered sugar ALL OVER your face. 

Ingredients
1/2 cup peanut butter
1/4 cup butter
1 cup chocolate chips
1/2 teaspoon vanilla
9 cups Chex cereal (any variety)
1-1/2 cups powdered sugar

Directions
Combine peanut butter, butter and chocolate chips in a microwave safe bowl.

Microwave for one minute then stir to blend all ingredients thoroughly. Add 1/2 tsp. vanilla. Stir well.

Place the 9 cups of Crispix cereal in a very large bowl.

Pour the peanut butter-chocolate mixture over the cereal and toss evenly, making sure all the cereal gets a good covering.

Coat with powdered sugar, sprinkling evenly over the cereal and tossing as you sprinkle to cover each piece well.
IMG_0785

Thursday, December 9, 2010

Buckeyes

I'm not much for candy making. It's a precise science--and one that I'm not very fabulous at. But for peanut butter and chocolate, I make an exception. Being from Ohio, I have a special place in my heart for Buckeyes. Not only do I love some Ohio State football, but if I'm at a party and there are these perfect treats out, you can bet your bottom dollar I'll be indulging. In Ohio, there are numerous culinary schools where you can learn the precise skill of candy making.

STP65122

These are not difficult to put together, but they do take some time. I actually propped open a book to read while I was rolling all of the balls of filling. :)  I also picked up a few tips and tricks from the issues I had the first time through. I believe freezing the filling will do two things--1) keep the toothpick in more firmly. and 2) prevent the warm chocolate from melting it. If you can insert the toothpick in the side of the ball and cover the hole with the chocolate, you can avoid that little toothpick hole in the top of the buckeye.

Ingredients
1/2 cup unsalted butter, softened
1-1/2 cup creamy peanut butter
1 tsp vanilla
4 cups confectioners' (powdered) sugar
coating:
1 pkg (12 oz) semi sweet chocolate chips (2 cups)
1 Tbsp shortening 

Directions
Cream butter, peanut butter and vanilla together adding confectioners' sugar until proper consistency is reached. Filling should be slightly dry and crumbly, but able to hold together after pressing together in the palms of your hands. Roll candy into 1 inch balls and place on cookie sheet lined with wax paper. Place in the freezer while you melt the chocolate (30 minutes would be optimal.) 

Create a double boiler by filling a 2 quart sauce pan with 2 inches of water. Bring to a boil. Place a heat resistant glass mixing bowl (1.5 qt) into the sauce pan (the bowl should not touch the water.) Pour in chocolate and shortening and stir occasionally until melted. Turn the burner down to low. 

Remove the peanut butter balls from the freezer. Using a toothpick stuck into the side of each ball dip into the chocolate, leaving a dime sized portion of filling exposed (mimicking the look of a buckeye nut.) Carefully remove the toothpick. Coat all of the candy balls and return cookie sheet to the freezer for an hour or more. 

Store in an airtight container

Wednesday, December 8, 2010

Vanilla Almond Sugar Cookies

IMG_2576

I love a good sugar cookie. I have not had much success in being the creator of said "good" sugar cookie. I roll them too thin. I bake them too long. I break them. I don't know how to frost them.

But I have officially discovered my favorite sugar cookie recipe AND it's super simple. (I will be tackling the royal icing in the near future.)
IMG_0892

A couple of my favorite things about these cookies are:
1. the butter can (and should) be used straight from the fridge.
2. the batter does not need to be refrigerated..
3. the almond extract makes these distinct from all other sugar cookies.

IMG_0899

Vanilla-Almond Sugar Cookies
adapted from Bake at 350
makes 3-1/2 dozen cookies

Ingredients
3 cups all-purpose flour
2 tsp baking powder
1/2 tsp salt
1 cup sugar
2 sticks unsalted butter, cold
1 egg
3/4 tsp pure vanilla extract
1/2 tsp pure almond extract

Directions
Preheat oven to 350.

Combine the flour and baking powder, set aside. Cream the sugar and butter. Add the egg and extracts and mix. Gradually add the flour mixture and beat just until combined, scraping down the bowl, especially the bottom.

The dough will be crumbly, so knead it together with your hands as you scoop it out of the bowl for rolling.

Roll onto a floured surface. (A silicone baking mat is amazing for rolling out cookies.) Dough should be at least 1/4 inch thick. Cut into shapes. (Dig the cookie cutter into flour before each use to keep dough from sticking.)   
Place on baking sheets and bake for 8-10  minutes. Let sit a few minutes on the sheet, then transfer to a cooling rack.

IMG_2577

Tuesday, December 7, 2010

Hearty Tomato Soup

It was a cold, rainy, dreary day. I needed soup in a bad way. After much deliberation I decided tomato soup was the solution. I hunted and hunted for recipes, but didn't find the one to suit my needs. So, I did what I've become accustomed to doing--I made up my own recipe! 

STP65113
This is not quite your traditional creamy tomato soup. Actually, it's not like that at all. I plan to come up with that recipe sometime this winter. No, this tomato soup is in a different class altogether. It's got hearty chunks of tomatoes and has the flavor of a fantastic Italian marinara. Perfect for Kevin and me. I hope you enjoy it!

Ingredients
1 small onion, finely chopped
2-3 cloves garlic, minced
1 carrot, washed and shredded
1 tsp pepper
2 tsp Italian seasoning
pinch of Thyme
pinch of Crushed Red Pepper flakes
1--28oz can whole tomatoes
1--46oz can tomato juice
1/2 cup milk or cream
Feta Cheese, optional
Parmesan, optional

Directions
Heat a 6 quart stock pot to medium. Drizzle with canola or extra virgin olive oil and dump in the onions, garlic, carrots and spices. Saute until softened and fragrant, stirring occasionally. Stir in the whole tomatoes and gently crush with a potato masher.  Cook for 5 minutes. Stir in tomato juice and bring to a boil. Reduce heat to low and simmer for at least one hour (the longer the better!) Stir in the milk or cream and cook until heated through. 

Serve with a sprinkle of feta and/or Parmesan cheese...and possibly a grilled cheese sandwich. 

STP65119

Monday, December 6, 2010

Challah Bread (Jewish Egg Bread)

STP65098
Though this recipe has quite a few steps and take some time to prepare, it's really not difficult. I mean, aside from the brute strength it takes to stir in 8 cups of flour into the wet ingredients to form the dough. Oh. my. word. That was a seriously workout. 

STP65112
In any case, the pain and time is TOTALLY worth it. This really lives up to Smitten Kitchen's description of the Best Challah. This is a traditional Jewish egg bread that is slightly dense and perfectly sweetened with a gorgeously crisped crust. A day or two after baking, the bread is amazing as toast and makes the most incredible French Toast from what I hear. 

Perfect for your holiday gatherings, this loaf can be created with a simple 3 strand braid or an impressive 6 strand braid and even shaped into a festive wreath. 

Best Challah (Egg Bread)
recipe adapted from smittenkitchen.com


Time: about 1 hour, plus 2 1/2 hours’ rising
Yield: 2 loaves

Ingredients
1-3/4 cup lukewarm water
1 1/2 packages active dry yeast (1 1/2 tablespoons)
1 tablespoon plus 1/2 cup sugar
1/2 cup olive or vegetable oil, plus more for greasing the bowl
5 large eggs
1 tablespoon salt
8 to 8 1/2 cups all-purpose flour
1/2 cup raisins per challah, if using, plumped in hot water and drained
Poppy or sesame seeds for sprinkling, optional

Direction
In a large bowl(large enough for mixing 8 cups of flour), dissolve yeast and 1 tablespoon sugar in 1 3/4 cups lukewarm water.

Whisk oil into yeast, then beat in 4 eggs, one at a time, with remaining sugar and salt. Gradually add flour. When dough holds together, it is ready for kneading. (You can also use a mixer with a dough hook for both mixing and kneading, but be careful if using a standard size KitchenAid–it’s a bit much for it, though it can be done.)

Turn dough onto a floured surface and knead until smooth. Clean out bowl and grease it, then return dough to bowl. Cover with plastic wrap, and let rise in a warm place for 1 hour, until almost doubled in size. Dough may also rise in an oven that has been warmed to 150 degrees then turned off. Punch down dough, cover and let rise again in a warm place for another half-hour.

At this point, you can knead the raisins into the challah, if you’re using them, before forming the loaves. To make a 6-braid challah, either straight or circular, take half the dough and form it into 6 balls. With your hands, roll each ball into a strand about 12 inches long and 1 1/2 inches wide. 

STP65104
Braiding the loaf: (for a photo depiction of these directions check out this helpful site.)
Place the 6 in a row, parallel to one another. 
Pinch the tops of the strands together. 
The 2nd strand from the left goes all the way to the right (crosses over). 
The 1st strand from the left goes to the center. 
The 2nd strand from the right goes all the way to the left. 
The 1st strand from the right goes to the center.
Continue this until all strands are braided. 
For a straight loaf, tuck ends underneath. 
For a circular loaf, twist into a circle, pinching ends together. 

Make a second loaf the same way. Place braided loaves on a greased cookie sheet with at least 2 inches in between.

Beat remaining egg and brush it on loaves. Either freeze breads or let rise another hour.

If baking immediately, preheat oven to 375 degrees and brush loaves again. Sprinkle bread with seeds, if using. If freezing, remove from freezer 5 hours before baking.

Bake in middle of oven for 30 to 40 minutes, or until golden. (If you have an instant read thermometer, you can take it out when it hits an internal temperature of 190 degrees.) Cool loaves on a rack.

Note: Any of the three risings can be done in the fridge for a few hours, for more deeply-developed flavor. When you’re ready to work with it again, bring it back to room temperature before moving onto the next step.

Round or straight braid? Raisins or skip them? Straight loaves of braided challah are eaten throughout the year–typically on the Sabbath–round challahs, often studded with raisins, are served for the New Year and the other High Holidays that follow.

STP65111

Saturday, December 4, 2010

Smashed Potatoes

I know some people don't like the skins of potatoes, but I just have to disagree. Not only are the skins delicious but they're chock full of the potato's nutrients. On top of THAT, making mashed potatoes is a pain in the rear if you choose to peel all of them. I've cut my fingers and thrown potatoes across the kitchen so many times, I've proven to myself that peeled potatoes are (almost) never worth it. 

/end rant/

STP65064

That said, my family is totally cool with smashed potatoes--mashed potatoes with the peels on. This particular recipe is what I devised in making Thanksgiving dinner for 8 adults. We had quite a lot of leftovers but we used them up in potato soup the next day. Cut this recipe in half (or more) to serve a family of four. 

serves: 10-12 (aka Thanksgiving Sized Potatoes)
Ingredients
5lbs Russet potatoes, washed and chopped (do NOT peel)
1/4 cup softened butter
1/2 to 1 whole cup milk 
salt 
pepper
1 tsp parsley flakes 
1 tsp garlic powder

Directions
If preparing the potatoes the night before, chop them, place in a large stock pot, and cover with cold water. Refrigerate. This will keep potatoes from browning. Remove from the fridge at least one hour prior to cooking to bring water to room temperature.

Cover potatoes with water by an inch. Bring to a boil and cook until easily pierced by a fork (15 minutes for this amount of potatoes.) Drain potatoes and return to the pot. Add in the butter by the tablespoon and allow it to melt. Sprinkle in spices and add in 1/2 cup of milk. Mash. Slowly add in additional milk until potatoes are smooth and fluffy.  

Wednesday, December 1, 2010

Never-Fail Pie Crust

This is the best, most trustworthy pie crust recipe ever. It has never failed me. It's easy to put together and crowds go wild over the flaky, melt in your mouth crust. The shortening in the key. I know, I know, butter is better. But not here, my friends. Trust me.

STP65093


Never-Fail Pie Crust
Makes two (2) two-crust pies (use only half of this recipe for one apple pie)

Ingredients
2 cups shortening (this is the key!)
4 cup flour
dash of salt
1 egg, beaten
1 Tbsp vinegar
1/2 cup cold water

Directions
Mix shortening, flour and salt with a fork or pastry blender or stand mixer until crumbly.
In a small bowl, mix together egg, vinegar, and water. Pour the liquid mixture into flour mixture. Mix with flour until dough forms. If dough is too wet to handle, sprinkle in additional flour and stir to combine.

After dough is complete, divide the dough into 4 equal parts (or 2 if you halved the recipe) and flatten each portion slightly into a circle (approx. 5 inch round).  Refrigerate for at least 30 minutes.  This allows for much easier rolling.

If you need additional tips for rolling out the dough, feel free to ask.  I've learned a lot of lessons!

While crust is chilling, start on your pie filling of choice and follow the pie recipe's baking directions.

Saturday, November 20, 2010

Barbeque Chex Mix

This barbeque chex mix was requested by my husband--I'm so glad I obliged. This is a delicious snack, super fast to make, and a really great "appetizer" to set out before your holiday meals. 

STP64984

Ingredients
3 cups rice Chex
3 cups corn Chex
2-3 cups miniature pretzels
1 cup dry roasted peanuts
1/4 cup barbeque sauce
1 tsp onion powder
1 tsp garlic powder
1 tsp chili powder
black pepper

Directions
Preheat oven to 325 degrees. 
In a large bowl, combine cereals, pretzels, and peanuts. In a medium bowl stir together bbq sauce, onion powder, garlic powder, chili powder and pepper. Pour the sauce mixture over the dry ingredients and stir until thoroughly distributed. Spread onto a large cookie sheet and bake for 15-20 minutes, stirring halfway through. 
Mixture will not be dry when you remove it from the oven. 
Spread onto a sheet of wax paper and allow it to cool completely. (Cereal and pretzels will crisp upon cooling.)  

STP64979

Thursday, November 18, 2010

Cranberry Cinnamon Nut Chex Mix

This was the first time I had attempted a "Chex Mix" and I chose two varieties--cinnamon and barbeque. I checked out a variety of recipes on the Chex website  and came to the conclusion that I should just throw a few of my favorite ingredients in a bowl and call it good. :) This mixture is quite delicious--especially if you're a fan of walnuts, cranberries (raisins would work too) and cinnamon. 

STP64990

Ingredients
3 cups rice Chex
3 cups corn Chex
1 cup chopped walnuts
1 cup dried cranberries
1-1/2 tsp cinnamon
pinch of nutmeg
4 packets Splenda or 3 Tbsp sugar
1/4 cup melted butter

Directions
Preheat oven to 325. 
In a large bowl, combine cereal, walnuts, cranberries, cinnamon, nutmeg, and sugar. Melt the butter in a microwave safe bowl and bowl over the dry mixture. Stir until every the butter is evenly distributed. 
Spread on a large cookie sheet and bake for 15 minutes, stirring once halfway through. 
Pour mixture onto a sheet of wax paper to cool before storing in an airtight container. 

STP64991

Thursday, November 11, 2010

Slow Cooked Vegetable Pork Roast

This is one of the easiest meals to put together and by the end of its cooking time it's completely irresistible. I'm not a huge meat eater, but I was in love with this. Kevin went back for seconds and thirds--which only happens if he's totally crazy about the meal. 
STP64783

Slow Cooker Vegetable Pork Roast
serves 4 
Ingredients
3-4 lb pork loin roast 
4-5 small potatoes, chopped
2 carrots, sliced (1/2" slices)
1 small onion, thinly sliced
1--14.5oz can cream of mushroom soup
      plus one can of water
salt
pepper
1 cup chopped kale, options

Directions
Fill your 4-5 qt. crockpot with potatoes, carrots, and half of the onions. Pour the mushroom soup and one can of water onto the potatoes and stir to combine. Generously salt and pepper the pork roast--patting the spices into the meat. Place meat on top of potato mixture and top with remaining onions. Cook on high 4 hours or on low 6-8 hours. Fifteen minutes prior to serving, stir in chopped kale. 

Wednesday, November 10, 2010

Cinnamon Sugar Biscotti

STP64760
Biscotti are a twice-baked Italian cookie that are just begging to be enjoyed by dunking into your favorite hot beverage. I grew up around these--being from an Italian family. My grandma would always have these hard cookies around to eat with her cup of tea. I never really understood their appeal back then. But now? I'm totally geeked about these things.

I made biscotti for the first time two Christmases ago and I wasn't all that impressed with them. I think I overbaked the darn things. But if you're careful, the result of this recipe is perfectly delicious.


STP64754


Cinnamon Sugar Biscotti
recipe from Joy the Baker

Yield: about 20-24 cookies
Ingredients
For the dough:
2 cups all-purpose flour
1½ tsp. ground cinnamon
1 tsp. baking powder
¼ tsp. salt
1 cup sugar
6 tbsp. unsalted butter, at room temperature
1 large egg plus 1 large egg yolk
1 tsp. vanilla extract

For the topping:
¼ cup sugar
1 tsp. ground cinnamon
1 large egg, lightly beaten

Directions
Preheat the oven to 325˚ F.  Line a baking sheet with parchment paper or a silicone baking mat.  In a medium bowl, combine the flour, cinnamon, baking powder, and salt; whisk to blend and set aside.  In the bowl of an electric mixer, cream together the butter and sugar on medium-high speed until lightly and fluffy, 3-4 minutes, scraping down the bowl as needed.  Blend in the egg and then the egg yolk, beating well after each addition.  Blend in the vanilla until incorporated.  With the mixer on low speed, blend in the dry ingredients just until incorporated and a dough is formed.
Divide the dough into two halves.  Shape each half into a log 9 inches long by 1½ inches wide on the prepared baking sheet, spacing the logs at least 3-4 inches apart.  In a small bowl, combine the sugar and cinnamon for the topping and stir to blend well.  Lightly brush the tops of the logs with the beaten egg, and sprinkle generously with some of the cinnamon sugar mixture.
Bake for 40-45 minutes, rotating halfway through baking, until the tops are golden brown and slightly firm to the touch.  Remove the pan from the oven but maintain the oven temperature.  Once the logs are cool enough to handle, slice on the diagonal into 1½-inch slices (about 10-12 per log).  Place biscotti cut side-down on the baking sheet and sprinkle with more of the cinnamon sugar mixture.  Bake an additional 10-15 minutes, until crisp and golden.

Enjoy with your favorite hot beverage! This is a cookie that was made for dunking.
STP64755