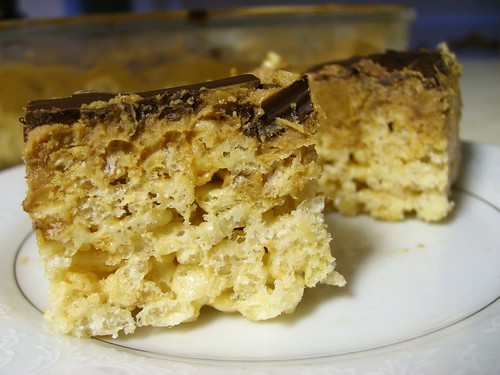
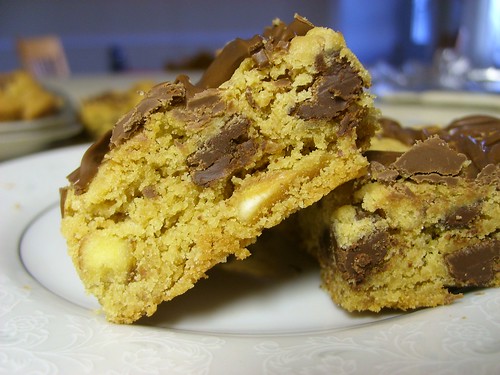
Sunday, October 31, 2010

Bar Cookies: Peanut Butter Pretzel Chocolate Chip

STP64686

STP64693

Well, they are a hot commodity in these parts. People just can't get enough of their goodness. I'm so excited everyone loves them!
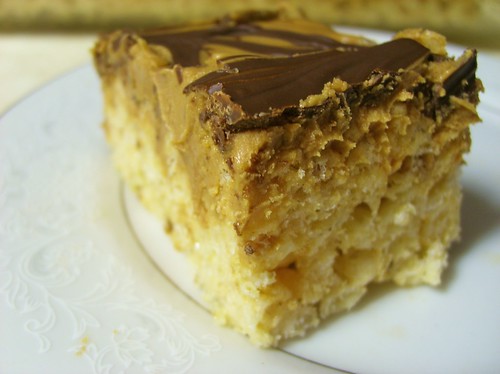
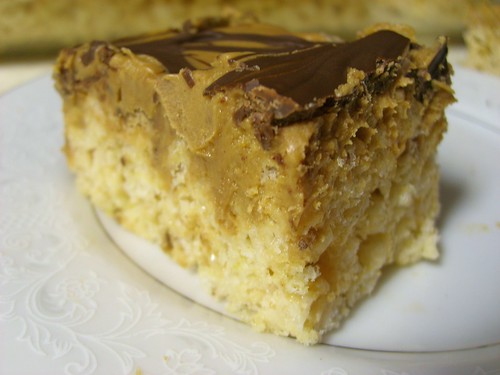
One my teens requested a cookie cake (bar cookies) of this cookie batter for her birthday. I excitedly obliged. 


I'm not sure I've ever made bar cookies. 
I had no idea what size pan to use or how long to cook them or how they'd turn out. 

But I made some random choices and they were the right ones!

These bars are SUPER EASY. I had them in the oven in 15 minutes flat! 

They baked up beautifully and taste delicious. 
I'm glad I hoarded a few for myself! :)
STP64685
Serves 24 
Ingredients
1/2 cup margarine, room temperature
(slightly less than) 1/2 cup shortening
(slightly more than) 1/4 cup peanut butter
3/4 cup sugar
3/4 cup brown sugar, packed
2 eggs
1 tsp vanilla extract
2-1/4 cups flour
1 tsp baking soda
1 tsp salt
3/4 cup crushed pretzels 
1-1/2 cups chocolate chips
2 squares candy coating/chocolate bark (or 1 cup chocolate chips)--for drizzling 

Directions
Preheat the oven to 325 degrees. 
Cream together margarine, shortening, peanut butter and both sugars. When light and fluffy and thoroughly combine, mix in one egg at a time. Then mix in vanilla. In a separate bowl, whisk together flour, baking soda and salt. Stir into creamed ingredients in 2 or 3 additions--just until thoroughly combined. Stir in pretzels and chocolate chips. 

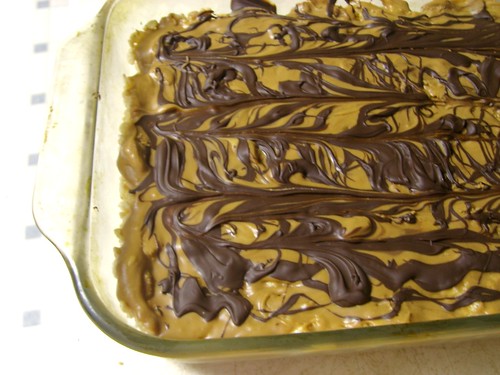
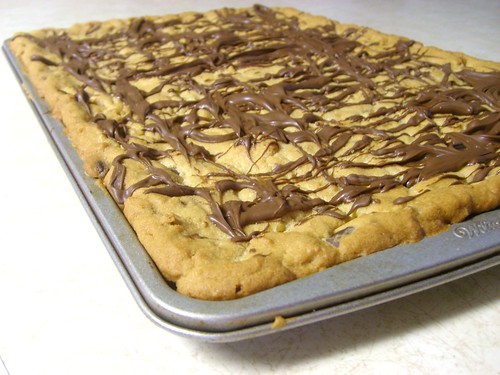
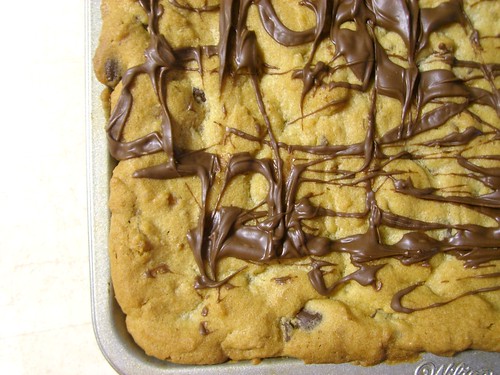
Spoon into a jelly roll style baking sheet (15.25"x10.25" or a little larger.) Spread out evenly. 

Bake at 325 degrees for 15-20 minutes, until golden brown and just crisping on the edges. The center might not look set. Let cool completely on a wire rack. 

Melt 2 bars of chocolate bark (candy coating) or 1 cup of chocolate chips. Drizzle over the top of the cooled cookie bars. Slice and enjoy!


Saturday, October 30, 2010

Sourdough Pancakes


STP64663

I have to tell you, Kevin was not a fan of these. He just didn't think the flavor went well with syrup. They just didn't seem like "pancakes" to him.

On the other hand, I really loved these. I love sourdough (Kevin does too, but let's pretend he's not a factor here), and these taste exactly as I expected. I loved the fact that half of the job was done the night before and only took 3 seconds to complete. Try these! I'll be curious to know your thoughts!

Sourdough Pancakes
Ingredients

2 cups flour
2 cups water
1 Tbsp of yeast
2 eggs
1 tsp baking soda
1 tsp salt
1 Tbsp sugar
2 Tbsp oil


Directions
The night before, mix together flour, water and yeast in a glass, plastic or stoneware (NOT METAL) bowl. Let sit overnight on the counter.

In the morning add the eggs, baking soda, salt and sugar. Beat will into batter and then add 2 tablespoons of melted butter or oil.

Heat a pan to medium low--until a drop of water sizzles. Spoon batter onto the hot pan and cook until bubbles form. Flip and cook another couple minutes until golden.

Thursday, October 28, 2010

Perfect Pancakes

STP64714
Kevin wanted "normal" pancakes. 
No bananas, no pumpkin, no nuts, no wheat flour, no chocolate chips. 
Just "regular" pancakes. 
That's quite a difficult request for someone like me, but I wanted to oblige. 

I'm so glad I did!
The Pioneer Woman came through for us with this perfect pancake recipe!
They are thick and fluffy and yummy!
I cut all of the ingredients by 1/3 to serve the two of us and there was more than enough batter. 


STP64718
serves 6 
Ingredients
3 cups Plus 2 Tablespoons Cake Flour
½ teaspoons Salt
3 Tablespoons Baking Powder
2 Tablespoons Sugar
2 cups Milk
2 whole Large Eggs
3 teaspoons Vanilla
4 Tablespoons Butter
Extra Butter
Maple Or Pancake Syrup

Directions
Mix together dry ingredients in large bowl.
Mix together milk, eggs, and vanilla in a separate bowl.
Add wet ingredients to dry ingredients, stirring very gently until just combined.
Melt butter and add it to the batter, stirring gently to combine.
Cook on a greased skillet over medium-low heat until golden brown. Serve with an obscene amount of butter and warm syrup.

Source: The Pioneer Woman

Wednesday, October 27, 2010

Peanut Butter Cup Rice Krispies Treats


STP64706
STP64710

Right before youth group on Sunday I realized we should be celebrating my husband's birthday, as it was coming up that week. Eeek! I asked him what he was craving and he said "peanut butter." Awesome. I'm totally a fan (of my husband and of peanut butter).  I quickly searched my favorite recipe blogs and found a large variety of delicious recipes. These peanut butter cup rice krispie treats stood out as the winner--quick and easy. HOWEVER, be prepared to dirty every pan in your kitchen. 

But it's so worth it. Everyone was drooling over these (not literally, thank goodness!) Kids and adults will love these! 
STP64700
Peanut Butter Cup Rice Krispies Treats

Yield: 24 squares (or cut into smaller bars for a yield of 48)

Prep Time: 20 minutes

6 cups Rice Krispies
1 bag (10.5-oz) marshmallows
¼ cup (2 ounces) unsalted butter
1-1/2 cups creamy peanut butter
1 bag (12-oz) miniature peanut butter cups (about 40), quartered OR 9 large Reese's cups, chopped
1 cup milk or semi-sweet chocolate chips 

Directions
Butter a 9×13-inch pan and set aside.

Spray a large mixing bowl lightly with non-stick cooking spray. Measure the cereal into the large mixing bowl and set aside. Melt the marshmallows and butter together in a medium saucepan over medium heat (or in the microwave for about 3 minutes, but keep watch so the marshmallows don’t puff over the sides of the bowl!). Pour the melted marshmallow mixture over the cereal and mix well so the cereal is coated (using spoon sprayed with non-stick spray.) Pour into the prepared pan and use a buttered (or non-stick sprayed) piece of wax  paper to press evenly into pan.

In the microwave, melt the peanut butter until thin, about 1 minute. Gently stir in the quartered peanut butter cups and then pour over the treats. Using the back of a spoon, gently spread the peanut butter mixture evenly across the top.

Again in the microwave, melt the chocolate chips. Using a spoon, drizzle the melted chocolate across the top. Place the pan in the refrigerator to set before cutting and serving. Store in an airtight container.

Source: adapted from Brown Eyed Baker

STP64712

Sunday, October 24, 2010

Coffee Ice Cream


If you like coffee or enjoy the occasional coffee flavoring in a frappuccino then you will LOVE this ice cream. This is the first time I have (successfully) made a custard-based ice cream and man! it is totally worth the extra time and effort. The addition of the egg yolks to the heavy cream creates an even creamier frozen dessert and steeping the whole coffee beans in the cream results in the PERFECT flavoring of coffee. Best ice cream ever! You will want to prepare this ice cream hours or even a day in advance as it requires a lot of cooling and warming and steeping time. 

I can't wait to try a slice of the Mississippi Mud Pie I filled with this ice cream. Divine, I'm sure! 


Coffee Ice Cream
Ingredients
1½ cups whole milk
¾ cup sugar
1½ cups whole coffee beans
Pinch of salt
1½ cups heavy cream, divided
5 large egg yolks
¼ tsp. vanilla extract
¼ tsp. finely ground coffee or espresso powder

Directions 
Combine the milk, sugar, coffee beans, salt and ½ cup of the heavy cream in a medium saucepan over medium-high heat.  Once the mixture is warm and just begins to bubble, remove from the heat and let steep at room temperature for 1 hour.  

After steeping, return the saucepan with the coffee mixture to the burner over medium heat.  Pour the remaining 1 cup heavy cream into a large bowl and set a mesh strainer over the top.  In a separate bowl, whisk the egg yolks until smooth.  Once the coffee mixture has become warm again, slowly pour the mixture into the bowl with the egg yolks, whisking constantly to temper the eggs.  Return the egg-coffee bean mixture to the saucepan over medium high heat. 

Cook the mixture, stirring constantly and scraping the bottom, until the mixture thickens and coats the spatula or spoon (about 170-175° F.)  Pour the custard through the strainer and stir it into the cream.  Press on the coffee beans in the strainer to extract as much of the coffee flavor as possible, then discard the beans (I used a heavy-bottomed drinking glass to do this.)  Mix in the vanilla and ground coffee or espresso powder.  Chill the batter over an ice bath, or in the refrigerator.  Chill thoroughly in the refrigerator (overnight is preferable) and then freeze in an ice cream maker according to the manufacturer’s instructions. 


Saturday, October 23, 2010

Pumpkin Butterscotch Cookies

I would agree with Annie--these cookies will never win a beauty contest. But despite their drab color palette, these cookies live up to their pumpkin color and flavor. Cakey, sweet, and just the right amount of spice, I recommend you give these little babies a try this harvest season. (Just don't overbake! Mine were a not quite moist enough for me.)


Pumpkin Butterscotch Cookies
Yield: about 2 dozen cookies
Ingredients
2 cups all-purpose flour
1½ tsp. baking powder
1 tsp. baking soda
½ tsp. salt
1 tsp. ground cinnamon
2 large eggs
1 cup sugar
½ cup vegetable or canola oil
1 cup pumpkin puree
1 tsp. vanilla extract
1 cup butterscotch chips

Directions
Preheat the oven to 325° F.  Line two baking sheets with parchment paper or silicone baking mats.  In a small bowl combine the flour, baking powder, baking soda, salt and cinnamon; whisk to blend.  In a the bowl of an electric mixer combine the eggs and sugar.  Beat on medium-high speed until smooth and light in color, about 1 minute.  Blend in the oil, pumpkin puree, and vanilla extract until well combined.  With the mixer on low speed, mix in the dry ingredients just until incorporated.  Gently fold in the butterscotch chips with a spatula.
Drop mounds of dough onto the prepared baking sheets (I used a medium-sized dough scoop), spacing them a few inches apart.  Bake, rotating the sheets halfway through baking, until the tops feel set and a toothpick inserted in the center comes out dry, about 14-16 minutes.  Allow to cool on the baking sheets 5-10 minutes before transferring to a wire rack to cool completely.  Store in an airtight container.

Source: Joy the Baker and Annie's Eats

Thursday, October 21, 2010

Italian Style Hearty Vegetable Stoup

Yes, "stoup."
Yes, I stole that from Rachael Ray. 
But it's totally applicable here--this is somewhere between stew and soup. Stoup.

Ok, now that we've got that cleared up, on to the recipe. 
This deliciously filling meal was created out of my need to use up an eggplant, 
my longing for a bowl of warm soup, 
Kevin's request for "something with rice," 
and my natural Italian inklings. 

Feel free to substitute any vegetables YOU need to use up for the ones I include here. 
Yes, Mom, you can deviate from the recipe--it's ok! :)

Serves 6-8
Ingredients
2 cloves garlic, minced
1 small onion, diced
2 large carrots, washed (no need to peel!) and thinnly sliced
2 celery stalks, washed and sliced
1 green pepper, diced
1 medium eggplant, cubed 
2 tsp Italian seasoning
a sprinkling of crushed red pepper
1-2 tsp chili powder
Pepper
1-28 oz can crushed tomatoes
1-15 oz can diced tomatoes
1 cup tomato or pasta sauce
3 cups beef (or other) broth 
2 cups brown rice, cooked
Parmesan cheese, for sprinkling

Directions
Heat a 6 qt stock pot over medium heat. Drizzle with oil. Drop in garlic, onions, carrots, celery and peppers. Reduce heat to low/medium-low and cook until carrots are softened. Be careful not to have the burner too hot--the garlic will burn. In a separate large skillet, heat a drizzle of oil. Saute eggplant until softened and browned (OR cook in a 375 degree preheated oven for 15-20 minutes.)
Stir eggplant in with the other vegetables in the stock pot. Stir in seasonings. Add crushed tomatoes and diced tomatoes--combine thoroughly. Stir in beef broth and tomato sauce. Simmer on low for 20-45 minutes until fragrant and tasty. Stir in brown rice. Serve with a garnish of parmesan cheese. 

For reheating purposes: This soup will thicken significantly due to the rice. You will likely need to add a splash or two or three of water to the bowl of soup before heating.


Sunday, October 17, 2010

Peanut Butter Banana Muffins

You may have heard I love peanut butter. 
For reals. 
It's my favorite food group condiment.
I love spreading peanut butter on my warm toast, 
on my Ritz crackers, 
on my apple slices,
on my carrot sticks, 
on my bananas. 
Yes, peanut butter is the perfect topper for almost anything. 

So as I was baking these pumpkin ginger nut muffins, I thought, "There are a couple beautifully overripe bananas? What can you make with those? MORE MUFFINS! And should you make regular old banana muffins? NOOOOO. Be creative, Mel. Think, think!"

And before long I had come up with this genius idea to make a peanut butter banana muffin. 
YUM!
It took a bit of thinking to come up with the right proportions.
Melting the peanut butter makes it somewhat of a liquid, BUT it's peanut butter and peanut butter lends itself to "dry" by nature. 
I added a bit more liquid to the batter, crossed my fingers and hoped for the best. 
And gosh darn it, these are just plain delicious.
They are moist, melt-in-your-mouth peanut butter banana goodness.  
I hope you enjoy!


Peanut Butter Banana Muffins Recipe
by Melanie
Makes 12-14 muffins

Ingredients
1/2 cup creamy peanut butter, melted

1/4 cup vegetable or canola oil
1/4 cup water

1/4 cup milk 
2 eggs, beaten 
2 small ripe bananas, mashed
1-1/2 cup flour
1/2 tsp salt
1 tsp baking soda
1 cup sugar 

Directions
Preheat oven to 350 degrees. Line a large muffin tin with muffin cups OR spray with non-stick cooking spray.

Melt peanut butter in a microwave safe glass measuring cup. Mix together peanut butter, oil, water, milk, eggs, and bananas. In a separate bowl, stir together flour, salt, baking soda, and sugar. Mix dry ingredients into wet ingredients in 3 or 4 additions--being sure flour is incorporated into the mixture before adding more.

Pour batter into the muffin tins, filling 3/4 full. Bake for 20-25 minutes or until toothpick inserted in the center comes out clean. Cool in the muffin tin for 2 or 3 minutes, then remove to a wire rack to cool completely. 

Enjoy with a TALL glass of milk.

Saturday, October 16, 2010

Pumpkin Ginger Nut Muffins

 I was looking for a pumpkin muffin recipe for two reasons--
1. It's pumpkin time, people!
2. I needed a "to go" meal to send with our teens when we leave at 6am Saturday morning for a Bible Quiz.
Elise at Simply Recipes came through for me again!
These muffins are dense and hearty, while maintaining a perfect spice--ideal for harvest time weather.

Pumpkin Ginger Nut Muffins Recipe
adapted from Simplyrecipes.com
makes: 12 muffins

Ingredients
1 1/2 cups flour
1/2 teaspoon of salt
1 cup sugar
1 teaspoon baking soda
1 cup pumpkin purée
1/3 cup melted butter
2 eggs, beaten
1/4 cup water
1/2 teaspoon nutmeg
1/2 teaspoon cinnamon
1/2 teaspoon allspice
1 teaspoon ground ginger
1 cup chopped toasted walnuts or pecans, optional
2 Tbsp well chopped candied ginger, optional


Directions
Preheat oven to 350°F. In a medium sized bowl, sift together the flour, salt, sugar, and baking soda.
Mix the pumpkin, melted butter, eggs, 1/4 cup of water, and spices together, then combine with the dry ingredients, until just incorporated. Do not over-mix. (If you over-mix, you get little tunnels...like I did. oops!) Fold in the candied ginger and chopped nuts.
Spoon mixture into a prepared muffin tin. Bake for 20-25 minutes. If the muffins are lightly browning and a toothpick inserted into the center of the muffin comes out clean, then they are cooked.  Cool on a wire rack.

Friday, October 15, 2010

Pumpkin Granola


For once in my life, I actually followed the recipe--
and it totally paid off!
This granola is fantastic.
It has a great spice, a perfect texture, and a wonderful aroma.
It's addicting, really.

I'm so glad I stumbled upon this fantastic recipe blog by The Cooking Couple, Maria and Josh.
Their blog, Two Peas in a Pod, is right up my alley.
I'm looking forward to many more great recipe finds there!
In the mean time, you'll excuse me....
*nom. nom. nom.*


Ingredients
5 cups rolled oats
1 teaspoon pumpkin pie spice
1 teaspoon cinnamon
1/4 teaspoon nutmeg
¾ tsp. salt
¾ cup brown sugar
½ cup pumpkin puree
¼ cup applesauce
¼ cup maple syrup
1 teaspoon vanilla extract
3/4 cup dried cranberries, optional
1/2 cup sunflower seeds, optional
1/2 cup almonds, optional

Directions
Preheat the oven to 325° F. Line a large baking sheet with parchment paper and set aside.

In a large bowl, combine oats, spices, and salt. Mix well.

In a medium bowl, whisk together brown sugar, pumpkin puree, applesauce, maple syrup and vanilla extract.  Whisk until smooth.  Pour wet ingredients into oat mixture and stir until the oats are evenly coated. They will be moist. Evenly spread the mixture onto the prepared baking sheet.

Bake for 20 minutes. Remove pan from the oven and stir. Bake for an additional 15-20 minutes or until the granola is golden and crisp. Remove from the oven and stir in dried cranberries and pepitas. Let cool completely. Store in an airtight container.

*Note-serve granola with yogurt, milk, or enjoy plain.


Thursday, October 14, 2010

Peanut Butter Pretzel Chocolate Chip Cookies

  
This recipe is truly an original recipe.
It was inspired by my love of chocolate.
my love of pretzels. 
my love of peanut butter. 
and my love of any combination of those previously listed items. 
I wanted to whip up a batch of cookies to celebrate with our Bible Quizzers before they head to their first quiz of the season on Saturday. 
They deserve a treat. 
I knew the cookie needed to be classic. 
But it needed a twist.
As much as I love chocolate chip cookies, when I thought of adding peanut butter for a flavor flair and the pretzels for a salty crunch, I was REALLY hoping I was onto something. 
Sure enough, Kevin calls these his new favorite cookies. 
And I may or may not have had 5 of them today. 
YUM.
I shared these with our teens and all of them devoured the mound of cookies saying they were the best cookies ever and requesting them for their birthday (cookie) cake!

These cookies are just as amazing as your classic chocolate chip except with a tasty hint of creamy peanut butter and a crunchy, salty surprise of the pretzels!


Ingredients
1/2 cup margarine, room temperature
(slightly less than) 1/2 cup shortening
(slightly more than) 1/4 cup peanut butter
3/4 cup sugar
3/4 cup brown sugar, packed
2 eggs
1 tsp vanilla extract
2-1/4 cups flour
1 tsp baking soda
1 tsp salt
3/4 cup crushed pretzels 
1-1/2 cups chocolate chips

Directions
Cream together margarine, shortening, peanut butter and both sugars. When light and fluffy and thoroughly combine, mix in one egg at a time. Then mix in vanilla. In a separate bowl, whisk together flour, baking soda and salt. Stir into creamed ingredients in 2 or 3 additions--just until thoroughly combined. Stir in pretzels and chocolate chips. 

Bake at 350 degrees for 8-10 minutes, until just browning on the edges and not quite set in the center. Let cool on baking sheet 2 minutes before removing to a wire rack to cool completely.

Makes 4 dozen cookies. 


Wednesday, October 13, 2010

Apple, Onion, & Butternut Squash Gratin


I'll be honest, my first thought when I saw this recipe was "huh???"
I never would have come up with this combination of ingredients, but I have to say I'm SO GLAD I didn't let that stop me! 
This is a fantastic way to use butternut squash--Ezra Pound Cake is brilliant. 
You can hardly distinguish the onions from the apples from the squash. 
All of the flavors meld brilliantly into something sweet, savory and tangy--all at the same time. 

Four side dish servings. 
Recipe adapted from Ezra Pound Cake

Ingredients

3 tablespoons extra-virgin olive oil
2 medium leeks, white part only, trimmed of roots and tough outer leaves, thinly sliced crosswise, well washed and dried OR 1 small onion, thinly sliced. 
Coarse salt and ground pepper
1/2 cup dry sherry or apple cider (I omitted this--and there was enough liquid without it.)
1 tablespoon chopped fresh sage, plus leaves for garnish OR 2 tsp dried thyme
1 pound butternut squash, peeled, seeded, and sliced 1/8-inch thick
1 pound apples, such as Gala, Cortland, Baldwin, or Macoun, peeled, halved, cored, and cut into 1/8-inch thick slices
1/2 cup freshly grated Parmesan cheese


Directions
Preheat the oven to 350 degrees. In a 10-inch skillet, heat 2 tablespoons of oil over medium heat. Add leeks (Or oninos) and 2 tablespoons water; season with salt and pepper. Cook, stirring occasionally, until they begin to brown, about 10 minutes. Add sherry and sage (or thyme) and cook until liquid is reduced to a glaze, about 3 minutes; set aside.


In a 2-quart shallow baking dish, arrange squash in overlapping layers; season with salt and pepper. Spread leeks (or onions) evenly over the squash.

Arrange apples in an overlapping layer over the leeks. Brush apples with remaining tablespoon oil. Cover tightly with aluminum foil. Bake 45 minutes.

Uncover and sprinkle cheese over the top. Raise the oven temperature to 450 degrees and bake 10 minutes, or until the cheese has melted and is golden brown. The tip of a paring knife should easily pierce the gratin. Let cool 10 minutes before serving. Garnish with sage or thyme leaves.