Tuesday, April 20, 2010

Herb Roasted (Whole) Chicken


I consider myself a chicken connoisseur.
It is my favorite form of savory protein. 
I love it in nearly every form.
It's useful in practically every dish. 
It's just plain delicious. 
But this. 
THIS is THE best chicken I have EVER eaten. 
Seriously. 
Kevin and I were drooling over the bird. 
We may have dug in with our fingers. 
Ahh, the beauty of it being just the two of us. :) 
I don't normally eat the skin of chicken. 
But this. 
THIS was irresistible.

Before we sat down to eat (and after we had already "sneaked" a few savory bites) Kevin said, 
"Every time I want to marry you all over again." 
*blush* 

But seriously. This is the simplest meal ever.
It took maybe five minutes to prepare. 
Only an hour to cook.
And less than a minute to devour. ;)


serves: 3-4
Ingredients
1 whole chicken, 4-5lbs 
2-3 Tbsp canola oil
1-2 tsp parsley flakes 
1 tsp dried thyme 
1 tsp oregano 
salt & pepper
1 orange or lemon, quartered
1 small onion, quartered
3 cloves garlic, crushed

Directions
Preheat oven to 450 degrees. Remove wrappings and inner packing of chicken. Dry the surface of the chicken off thoroughly (in order to develop a crisp skin upon cooking.) 
In a small bowl whisk together oil and spices. Be generous with the salt and pepper. Slather the entire exterior of the chicken with the oil mixture. Stuff the chest cavity with aromatics (citrus, onion, garlic, etc.) 
Place on a shallow baking sheet or dish. Bake for 1 hour to 1 hour and 15 minutes or until crust is golden and crisp. 
Remove from oven and let REST for 10-25 minutes. This redistributes the juices throughout the meat, keeping it savory and extraordinarily moist. 
Pull off wings and drumsticks (the meat literally fell off of the drumsticks.) Slice breast meat as desired. Serve. and ENJOY.

Monday, April 19, 2010

Spicy Italian Sausage Chili

I was heading up a big fundraising event for our youth group.
The Church-wide Chili CookOff and Softball Night. 
Everyone was encouraged to bring their best pot of chili. 
And winner would go home with a $10 Applebee's gift card! 
Though I had been planning and plotting this event for months, one thing never occurred to me.
I should make chili. 
(Brilliant, right?!)
Participating in the chili cook-off hadn't, for whatever reason, entered my mind. 
Until the night before the event. 
So I figured I could throw something together as I always do.

This chili has a flavor all its own. 
It stands apart from the many other chilis I have created in the recent months of chilled temperatures. 
I started with the slices of sausage--my husband's fabulous idea. 
And from there the idea of an Italian themed chili was born. 
This turned out amazingly well. 
And while I didn't win, I did receive numerous compliments. 
Mostly from the teens! 
I'll take that! 

and you should make this!

Ingredients
canola oil, drizzle
3 sausage links (of your choice), sliced or ground 
3 cloves garlic, minced
1 whole onion, finely diced
1/2-1 whole carrot, grated (more=added sweetness)
2 small green peppers, diced
1/2-1 whole jalapeno, fined diced 
Salt
Pepper
1 tsp parsley
1/2 tsp basil
1/4-1/2 tsp chili pepper flakes
1 Tbsp (or more) chili powder
1-15 oz can diced Italian style tomatoes
2-15 oz cans kidney beans, drained and rinsed 
1 cup (8oz) beef bouillon broth
1-28oz can crushed Italian tomatoes
1-8oz can tomato sauce
1-8 oz can tomato paste 
1-2 cups water (depending on desired consistency) 

Directions
Heat large stock pot drizzled with canola oil to medium-medium high heat. Add sausage, onions and garlic and don't stir. This will allow the sausage to develop its color and release its flavor to the bottom of the pan. Stir and add in shredded carrot, green peppers and jalapenos. Cook until all the veggies are softened and fragrant. Add in salt, pepper, parsley, oregano, chili flakes, and chili powder. Stir to combine. 

Stir in beans and diced tomatoes. Stir in beef broth, using a wooden spoon to scrape (deglaze) the bottom of the pan--scraping up all of the delicious flavors of the sausage. Stir in remaining ingredients (adding water only to desired consistency). Let simmer 1 hour or more.

Friday, April 16, 2010

Lemon Chicken

Annie has done it again. 
This woman is seriously on my same path of thought and inspiration. 
As soon as I opened her recipe blog yesterday I knew I had just discovered my evening meal plan. 
This lemon chicken is Oh! so easy. 
And amazingly delicious. 
I, too, paired the chicken with rice and broccoli. 
The frozen broccoli was steamed to perfection. 
And I used whole grain brown rice in conjuction with my handy dandy rice cooker and a sprinkle of garlic salt. 
How was it that I ever thought I wouldn't use the rice cooker when we received it for a wedding gift?!

You should make this. 
Sometime soon. 
Preferably before summer. 
And then again during summer. 
It's just the perfect flavorings for the seasons.

recipe adapted from: Annie's Eats
Ingredients
2 tbsp. lemon zest (I didn't have a lemon. So no zest for me.)
1/3 cup freshly squeezed lemon juice
2-3 cloves garlic, crushed
2 tsp. fresh thyme leaves (I used dried)
1 tsp. fresh rosemary leaves, finely minced (I used dried oregano instead)
1 tsp. salt
1 tsp. black pepper
2-4 lbs. of bone-in, skin-on chicken thighs or drumsticks
2-3 tbsp. melted butter
Thinly sliced lemons, for garnished, optional

Directions
Combine the lemon zest, lemon juice, garlic, thyme, rosemary, salt and pepper in a large zipper-lock plastic bag.  Seal the bag and shake well to blend.  Place the chicken pieces in the bag with the marinade, pressing out excess air and sealing once more.  Refrigerate and let marinate for 2 hours.

Preheat the oven to 425˚ F.  Remove the chicken pieces from the marinade and transfer to a baking dish, skin-side up, reserving the leftover marinade.  Brush the top of each piece of chicken with melted butter.

Bake for 50-55 minutes, until the skins are crispy and well-browned.  Halfway through baking, pour the remaining marinade over the chicken pieces in the baking dish.  Once fully baked, cover loosely with foil and let rest 10 minutes before serving.  Transfer to a serving platter, garnish with lemon slices and serve.


Thursday, April 15, 2010

Strawberry Shortcakes


I couldn't believe I had never made shortcakes. 
It is possible that I had utilized the convenient "baking mix" (aka Bisquick) for this task, but even that is uncertain. 
The idea came for me in rapid succession. 
First, we were having two of our favorite friends over for dinner--Nick and Britt. 
After finally deciding on tacos for the main course, I wanted a lovely early summer dessert to top off our meal.
I had just finished making a batch of strawberry freezer jam when it occurred to me--
Strawberry Shortcakes. 
Brilliant! 
I had 2 pounds of strawberries leftover that needed to be used or else they would soon meet their demise. 
I wasn't sure if the berries would be good enough for this delightful dessert, but it turns out that adding sugar to the sliced berries yields pure strawberry perfection. 

The shortcake itself was so easy to throw together. 
One of the most low-maintenance desserts out there, I do believe. 
You can make these into "drop shortcakes" as well, but I liked the clean crisp lines that result from slicing the large cake. 
With an abundance of strawberries on sale in the grocery stores this week, I would definitely recommend this recipe for using the berries to their full potential. 

After one bite, you'll say, "MMmmmm!" 
Just like I may have in front of my company. :)


Serves 6-8
Recipe adapted from The Betty Crocker Cookbook.

Ingredients
2 pints strawberries (4 cups), sliced
1/2 cup sugar
----
2 cups flour
1/2 cup sugar
3 tsp baking powder
1/2 tsp salt
1/2 cup firm butter or margarine
2/3 cup milk
1 large egg, slightly beaten
Sweetened Whipped Cream

Directions
In large bowl, stir strawberries and 1/2 cup sugar until well mixed. Let stand about 1 hour so strawberries can develop their juices.

Heat oven to 375 degrees F. Grease bottom and sides of a 8 inch or 9 inch round pan; flour lightly.

In medium bowl, mix flour 1/2 cup sugar, baking powder and salt. Cut in butter, using pastry blender (or pulling 2 knives through ingredients in opposite directions), until mixture looks like coarse crumbs. Stir in milk and egg just until blended. Mixture will be extremely thick. Spoon into pan; spread evenly.

Bake 30 to 35 minutes or until toothpick inserted in center comes out clean. Cool ten minutes in pan. Place serving plate upside down on pan; turn plate and pan over and remove pan. (I ended up flipping my shortcake back over (as it was originally in the pan) simply because it looked prettier.) Cut shortcake into wedges (6-8). If desired, split shortcakes horizontally in half while hot. Fill and top each wedge with strawberries and Sweetened Whipped Cream.

for Sweetened Whipped Cream
Note: Always start with cream right from the fridge, and if possible chill your bowl and beaters in the freezer for 10 minutes until cold to the touch. Recipe may be halved.

Ingredients
1 cup heavy whipping cream
2 Tbsp granulated or powdered sugar
1 tsp vanilla

Directions
In chilled medium bowl, beat all ingredients with electric mixer on high speed until soft peaks form. 

Prepare for deliciousness.

Tuesday, April 13, 2010

Stuffed Poblano Peppers with Cheese Sauce


My refrigerator was overflowing with poblano peppers.
Ok, not quite overflowing. I had four.
And I had plans to use the in some scrumptious way.
Originally, I was going to roast them. Mostly because that's the typical first step in preparation of poblano peppers.
Though I'm not sure why.
I was browsing recipes for ideas and suddenly stuffed peppers sounded amazing.
I had never had a stuffed poblano.
The question was: how should they be stuffed?

I quickly started whole grain brown rice in my handy dandy rice cooker.
Because that takes FOREVER.
Or about 20 minutes.
Then I decided it needed black beans.
And tomatoes. And garlic and onions. duh.

And that's when it hit me!
I had a lovely batch of my favorite "dump" salsa in the fridge.
Black Bean Salsa.
I stirred this into the cooked rice.
Stuffed the peppers.
And BAM! We had a great dinner on our plates!

Now, a word of caution.
Poblanos are a tricky pepper.
They're not always spicy hot.
And they're not always pleasantly mild.
In our batch of 3 stuffed peppers we had two delightfully mild peppers.
And one burn-your-tongue-off-because-it's-hotter-than-a-jalapeno poblano pepper.
So tread lightly, folks.
And beware of the sneaky poblano.


Ingredients
3-4 large poblano peppers 
3 cups cooked brown rice 
  • Stir together: 
  • 1-15 oz. can black beans, drained and rinsed
  • 1-15 oz. can whole corn, drained
  • 1-15 oz. can diced tomatoes with chilis
  • 1 clove garlic, minced 
  • 1 small onion, finely chopped 
  • 2 Tbsp Italian dressing
  • salt and pepper 
1 Tbsp butter
1 Tbsp flour
1 clove garlic, minced 
salt
pepper
sprinkle of chili powder, if desired
1-2 cups milk
1 cup grated cheese

Directions
Cook rice. Preheat oven to 400 degrees. When rice is cooked stir in black bean salsa to desired proportion. Make a thin slice lengthwise down each poblano pepper. Do NOT cut all the way through. Leave stem attached, but remove veins and seeds. Stuff each pepper with the rice mixture.  Place in a greased 8x8 inch pan. Add 2-3 Tbsp water. Cover with tin foil. Bake for 45 minutes.  Remove foil (VERY carefully! The steam from the peppers can burn.) Place back in the oven for 5-10 more minutes while you make the cheese sauce. 

Heat a small saucepan to medium heat high. Add in butter and melt. Stir in garlic, salt and pepper. Saute 2-3 minutes, until fragrant. Whisk in flour forming a thickening agent (known as a roux). Cook out the flour for 1 minute. Slowly stir in milk--just one cup at first. Let thicken. Add more milk if needed. Stir in cheese and cook until melted. (Add more cheese if it needs to be thickened; add more milk if it needs to be thinned.) 

Place one pepper on dinner plate and top with cheese sauce. 


Wednesday, April 7, 2010

Pioneer Woman's Cinnamon Rolls


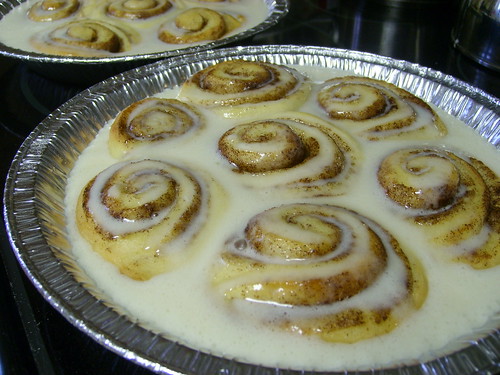
STP63547

I did it.
I finally did it!. And boy, I can't believe I lived this long without it. 
Yep, that's right.
I whipped up an ENORMOUS batch of Ree (aka The Pioneer Woman's) world famous (literally) cinnamon rolls.

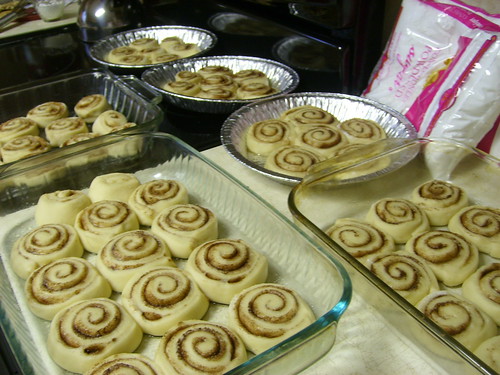
STP63540

I had the perfect opportunity. 
Fifteen teenagers were over for the night. 
Twenty four hours of Star Wars. 
My husband was in charge of corralling the troupes lined up in our tripped out basement--
complete with surround sound and projector screen.  
I monitored upstairs activities. 
Which, for the most part, included 8 crazy middle school girls screaming and squealing about every other thing. 
It's great!
I love my job.
And I love making people happy. 
And cinnamon rolls (well, food in general) are a great way to make people happy love you forever.

This recipe has been on my "to do" list for quite some time.
But I wasn't sure when I'd need a ton of rolls.
This was the perfect opportunity. 
I even have a tray of unbaked rolls in the fridge.
And took a pan over to the neighbors to celebrate their baby's arrival. 
And shared a couple with the pastor and the secretary.
And all of us ate at least two. 

Wow.

But talk about simple. 
These were totally easy to throw together and the ingredients are all of the on-hand variety.

My one caution: don't use a wooden spoon that holds emotional connections for you.
My spoon broke in HALF as I was stirring in the final cup of flour. 
Wow. I didn't know that was possible.

My second caution: (oops. I guess I lied about the one caution)
Don't...I repeat DO NOT make these unless you have people to eat them all. 
You might die of fluffy cinnamon roll sugar overload. 
Though it would be a sweet sweet death.


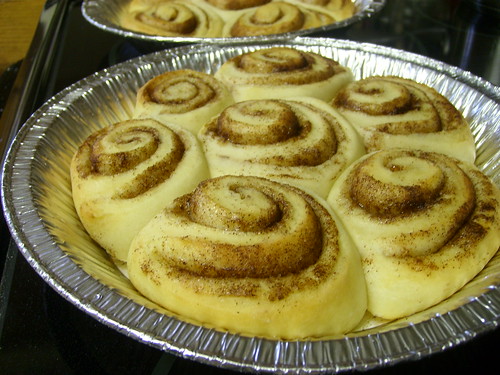
STP63544


Makes 48 cinnamon rolls. 
Adapted from The Pioneer Woman.

Ingredients
1 quart (4 cups) whole milk (I only had skim. They were still amazing.)
1 cup vegetable oil
1 cup sugar
2 packages (5 tsp) active dry yeast
8 cups (Plus 1 Cup Extra, Separated) all-purpose flour
1 teaspoon (heaping) baking powder
1 teaspoon (scant) baking soda
1 Tbsp (heaping) salt
Plenty Of Melted Butter
2 cups Sugar
Generous Sprinkling Of Cinnamon
_____
MAPLE FROSTING:
1 (2 lb) bag powdered sugar
2 teaspoons maple flavoring (I just squirted in some syrup b/c I had no flavoring. But I would recommend the flavoring.)
½ cups milk
¼ cups melted butter
¼ cups brewed coffee
⅛ teaspoons salt

Directions
Mix the milk, vegetable oil and sugar in a pan. “Scald” the mixture (heat until just before the boiling point). Turn off heat and leave to cool 45 minutes to 1 hour. When the mixture is lukewarm to warm, but NOT hot, sprinkle in both packages of Active Dry Yeast. Let this sit for a minute. Then add 8 cups of all-purpose flour. Stir mixture together. Cover and let rise for at least an hour.
After rising for at least an hour, add 1 more cup of flour, the baking powder, baking soda and salt. Stir mixture together. (At this point, you could cover the dough and put it in the fridge until you need it – overnight or even a day or two, if necessary. Just keep your eye on it and if it starts to overflow out of the pan, just punch it down).

When ready to prepare rolls: Sprinkle rolling surface generously with flour. Take half the dough and form a rough rectangle. Then roll the dough thin, maintaining a general rectangular shape. Drizzle 1/2 to 1 cup melted butter over the dough. Now sprinkle 1 cup of sugar over the butter followed by a generous sprinkling of cinnamon.

Now, starting at the opposite end, begin rolling the dough in a neat line toward you. Keep the roll relatively tight as you go. Next, pinch the seam of the roll to seal it.

Spread 1 tablespoon of melted butter in a seven inch round foil cake or pie pan or 9x13" pans. Then begin cutting the rolls approximately ¾ to 1 inch thick and laying them in the buttered pans. (Tip: cut the roll of dough in half. Then in quarters. Then in eighths. And so on. This maintains equal roll sizing.)
Repeat this process with the other half of the dough. Cover with tea towels and let the rolls rise for 20 to 30 minutes.

Preheat oven to 375 degrees and bake until light golden brown, about 15 to 18 minutes (for a 9x13) or 8-10 minutes for one 7inch pie plate.

For the frosting, mix together all ingredients listed and stir well until smooth. It should be thick but pourable. Taste and adjust as needed. Generously drizzle over the warm rolls. Go crazy and don’t skimp on the frosting.

Enjoy warm. Or rewarmed. Or cold. It's all good.


Friday, April 2, 2010

Cappuccino Fudge Cheesecake


With Easter Sunday quickly approaching, I knew I wanted to make a fantastic dessert. We're hosting much of our family for dinner, so this would be the perfect opportunity to indulge ourselves with something rich and delicious (which shouldn't be around for too long for the two of us to get fat on!) Annie came through for me AGAIN! Her version of Smitten Kitchen's Cappuccino Fudge Cheesecake looks amazing and with my success with Annie's New York Cheesecake last fall, I thought I could handle this too.  There are certainly a LOT of steps to make something so decadent but believe me when I say it's totally worth it. (Maybe just twice a year though. *wink*)

I made this three days in advance after reading Smitten Kitchen's post about refrigerating for up to four days. She said the flavors really concentrate and become even more amazing the longer it sits. Perfect! Who wants to be worrying about their cheesecake the day of a big event. 

Ingredients 
For the crust:
32 chocolate sandwich cookies, finely processed into crumbs
5 1/3 tbsp. unsalted butter, melted and cooled
Small pinch of salt

For the ganache:
1½ cups heavy cream
20 oz. bittersweet or semisweet chocolate, finely chopped OR  6oz unsweetened chocolate plus 14oz semisweet chocolate
¼ cup coffee flavored liqueur OR ¼ cup brewed (and cooled) espresso

For the filling:
3 (8 oz.) packages cream cheese, at room temperature
1 cup sugar
1½ tbsp. all-purpose flour
1½ tbsp. dark rum OR water
2 tbsp. instant espresso powder
2 tsp. vanilla extract
1½ tsp. mild-flavored (light) molasses OR dark
3 large eggs

For the topping:
1½ cups sour cream
1/3 cup sugar
2 tsp. vanilla extract

Directions
To make the crust, butter a 9-inch springform pan and place it on a baking sheet. Combine the chocolate cookie crumbs, melted butter and salt in a small bowl. Toss with a fork to moisten all of the crumbs. Press into a thin layer covering the bottom and sides of the springform pan (at least 3 inches up the sides). 


Bring the cream to a simmer in a medium saucepan.  Place the chocolate in a medium bowl. Once the cream reaches a simmer, pour the cream over the chocolate and let stand 1-2 minutes. Add the coffee flavored liqueur and whisk in small circles until a smooth ganache has formed. Pour 2 cups of the ganache over the bottom of the crust. Freeze until the ganache layer is firm, about 30 minutes. Reserve the remaining ganache; cover and let stand at room temperature for later decorating.  


Preheat the oven to 350˚ F and position a rack in the middle of the oven. In the bowl of an electric mixer fitted with the paddle attachment, beat the cream cheese and sugar on medium-high speed until well blended. Beat in the flour. In a small bowl, combine the rum, espresso powder, vanilla and molasses, stirring until the espresso powder dissolves. Add to the cream cheese mixture and beat until well incorporated, scraping down the sides of the bowl as needed. Beat in the eggs one at a time, scraping down the bowl between each addition.


Pour the filling over the cold ganache in the crust.  Place the springform pan on a rimmed baking sheet. Bake until the top is lightly browned, puffed and cracked at the edges, and the center moves only very slightly when the pan is lightly shaken, about 1 hour. Transfer to a wire cooling rack. Cool 15 minutes while preparing the topping (maintaining the oven temperature.)  


To make the topping, whisk together the sour cream, sugar and vanilla in a small bowl. Pour the topping over the hot cheesecake, spreading to cover the filling completely. (I was certain this was going to overflow. The Cheesecake came up to the brim. But don't fear. It worked just fine!) Bake until the topping is set, about 10-15 minutes. Return to the cooling rack and let cool at room temperature for at least 30 minutes.  Transfer to the refrigerator and let cool at least 3 hours, until completely chilled and set.  


To finish, wrap a warm towel around the outside of the springform pan to help loosen the crust from the sides. Carefully remove the springform. Transfer the cake to a serving platter. Place the reserved ganache in a pastry bag fitted with a decorative tip and use to garnish the top of the cake as desired. Garnish with chocolate-covered espresso beans as desired. Chill until the ganache is completely firm, at least 6 hours.   

Note: I kind of stink at piping. But I'll blame that on the lack of pastry bags and tips.
*more pictures of the insides will be added once we cut into it!